How to Rename Your Graphics Card in Device Manager?
Renaming a graphics card in Device Manager isn’t the most common task you’ll find in a tech enthusiast’s toolkit, but it has its uses.
So yes before we jump into the “how,” let’s talk about the “why.” Why would anyone want to rename their graphics card? It might seem odd unless you’ve got a specific reason. Let’s break it down.
Reasons You Might Want to Rename Your Graphics Card
1. A Little “Status Boost” in the Gaming World
In gaming circles, hardware is a big deal—sometimes as much as the game itself. Ever been in a forum where people flaunt their high-end GPUs like trophies? If you’re sporting a mid-range card, say a GTX 1660, and you want to up your street cred, you could rename it to something flashier like an RTX 3080.
No, it won’t magically make your computer run faster (if only), but it could earn you a nod from fellow gamers—at least until they figure out the truth. Be warned, though. When people expect RTX 3080 performance and you’re delivering GTX 1660 results, the illusion can shatter quickly. Awkward conversations may follow, especially when performance doesn’t match the high-end name you’ve claimed.
2. Streamers Playing the Underdog Card

This tactic pops up in the world of streaming too. Let’s say you’re a streamer running an older GT1030 but want to evoke some empathy from viewers. Renaming your GPU to its real model and showing it on-screen might help paint the picture of an underdog with outdated hardware. It could even inspire donations from sympathetic viewers who want to help you upgrade.
However, honesty is always key. Sure, you might get a few extra donations, but misleading your audience can backfire. If viewers feel tricked, they might lose trust, which is much harder to regain than a few extra bucks.
3. Organizing Your Setup
Not every renaming strategy has to involve trickery. Sometimes, it’s just about organization. Maybe you’ve got multiple GPUs—a basic one like Intel UHD or XE for day-to-day tasks and a high-powered one for gaming. Renaming them to something like “Gaming GPU” and “Office GPU” can help you keep things straight.
This can be a lifesaver if you’re juggling a complex setup, and in professional environments where you might be doing 3D rendering, streaming, and gaming all at once, a little organization can go a long way.
But Before You Start: Proceed with Caution
Renaming your GPU sounds simple enough, right? Just a few clicks in Device Manager, and you’re done. Well, there’s a little more to it than that. The process involves editing the Windows Registry, which is where things get serious. This is the part of your computer that controls all the critical settings, and a wrong move here can do more than just rename your GPU.
Risks of Editing the Registry
The Windows Registry is like the brain of your computer’s software. It manages all the settings that keep your operating system and apps running smoothly. If you accidentally mess with the wrong settings, you could create bigger problems than you started with.
For example, changing or deleting a key could prevent certain programs from working, cause your system to become unstable, or, in the worst case, make your PC unable to boot up.
Imagine you’re in the middle of an important project and suddenly your computer starts crashing or refusing to load certain apps. All because of a registry tweak gone wrong. That’s why you need to approach this carefully.
Backing Up the Registry: A Life-Saver Step
Before diving in, always back up your registry. This simple step can save you from a world of pain if things go sideways. Here’s how: open Registry Editor, go to File > Export, and name your backup something easy to recognize like “Registry Backup Before GPU Rename.” That way, if something goes wrong, you can restore your settings with just a few clicks. It’s peace of mind while you experiment.
How to Rename Your Graphics Card: Step-by-Step Guide

Follow these steps to rename your GPU while keeping things safe. Remember, this process involves editing the Windows Registry, so it’s important to proceed with care.
Step 1: Access Device Manager
First, you’ll need to open Device Manager, where Windows keeps track of all your system’s hardware. The quickest way to get there is by pressing Windows Key + X and selecting Device Manager from the list. Alternatively, press Windows Key + R, type devmgmt.msc, and hit Enter.
Once Device Manager is open, you’ll see a list of all the hardware components connected to your computer.
Step 2: Locate Your Graphics Card
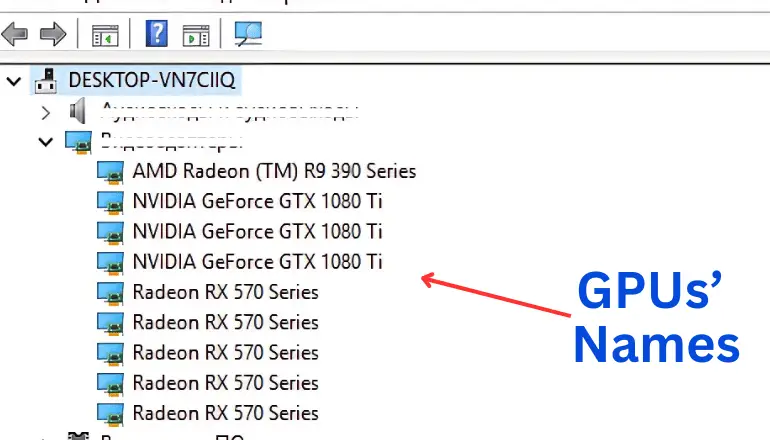
In the Device Manager window, look for the section labeled Display adapters. Click the small arrow next to it to expand the list. This will show all the installed graphics cards—both integrated and dedicated.
Find the GPU you want to rename. For example, if it’s an NVIDIA GeForce GTX 1660, right-click on its name and choose Properties from the drop-down menu. This will open a new window showing detailed info about your GPU.
Step 3: Obtain the Driver Key
Next, go to the Details tab in the Properties window. In the drop-down menu labeled Property, select Driver key. The driver key is a unique identifier for your specific GPU, and it’ll look something like this: PCI\VEN_10DE&DEV_1F02&SUBSYS_1F0210DE&REV_A1.
Copy this value by right-clicking on it and selecting Copy. You’ll need it for the next step.
Step 4: Open Registry Editor
Now it’s time to head into the Windows Registry, where you’ll be making the name change. Press Windows Key + R again, type regedit, and hit Enter to open Registry Editor.
Reminder: The Windows Registry controls important system settings, so tread carefully here. A misstep can cause issues, as mentioned earlier.
Step 5: Navigate to the Registry Path
In Registry Editor, you’ll need to find the folder that holds information about all your system’s hardware. The path you want is:
HKEY_LOCAL_MACHINE\SYSTEM\ControlSet001\EnumThis folder is like the directory for all the connected devices on your computer.
Step 6: Search for the Driver Key
There’s a lot of data in the Enum folder, so the easiest way to find your specific GPU entry is to use the Find function. Right-click on the Enum folder and select Find. Paste the driver key you copied earlier into the search box and click Find Next. This will take you to the registry entry for your GPU.
Step 7: Modify or Create the FriendlyName Value
Once you’ve found the registry entry for your graphics card, check if there’s a value called FriendlyName in the right-hand pane. If it’s there, double-click on it to modify the name. Now, you can type in whatever you want—“Super GTX 3090,” for example.
If FriendlyName doesn’t exist, no worries! Just create it. Right-click in the blank space of the right pane, select New > String Value, and name it FriendlyName (it’s case-sensitive). Double-click on this new entry and enter your desired name.
Step 8: Apply Changes and Refresh Device Manager
Once you’ve set the new name, click OK to save it. Now, head back to Device Manager. To apply the changes, click on Action in the Device Manager menu and choose Scan for Hardware Changes. This will refresh the list and update the name of your graphics card.
And that’s it! Your GPU or iGPU will now show up under its new name in Device Manager.
Conclusion
Renaming your graphics card in Device Manager can be a fun and useful way to customize your setup, whether you’re doing it for organizational reasons or just to make a statement. In this guide, we’ve walked you through the entire process—from accessing Device Manager and retrieving your GPU’s driver key, to making safe changes in the Windows Registry.
While renaming your GPU won’t improve its actual performance, it’s still a neat way to personalize your system. Just remember, editing the Registry always carries risks, so be sure to back up your settings before making any changes.
If tweaking hardware identifiers feels a bit too risky for you, there are plenty of other ways to personalize your system that don’t involve diving into the Registry. Consider exploring those options if you’re looking for a safer way to tweak your Windows experience.
