Fed Up with Windows 11 S Mode? 3 Quick Steps to Disable It!
If you’ve recently purchased a Windows 11, you might have found it preloaded with something called S Mode. At first glance, it might seem like just another feature designed to streamline your experience. But as many users quickly discover, S Mode’s restrictions can feel more like shackles than safeguards.
So, what exactly is Windows 11 S Mode? Designed as a lightweight, secure version of Windows, S Mode limits app installations exclusively to the Microsoft Store. This locked-down environment is aimed at providing better performance and heightened security, a good choice for devices marketed to students or those who prefer a more controlled system.
However, if you’re reading this, you’re probably not one of those users. Instead, you’re likely frustrated by S Mode’s inability to meet your specific needs—whether it’s installing software like Adobe Creative Suite, gaming platforms, or specialized tools for work. Let’s dive, how can you disable S mode in Windows 11 in just a few steps.
What Is S Mode, anyway?
At its core, S Mode is Microsoft’s attempt to create a more secure, streamlined version of Windows. By restricting app installations to the Microsoft Store, it ensures that only vetted, safe applications make their way onto your device. This minimizes the risk of malware, especially for users who aren’t tech-savvy enough to differentiate between legitimate downloads and malicious ones.
It also comes with built-in protections like Microsoft Defender Antivirus, which offers real-time monitoring to keep malware at bay. Additionally, with automatic updates constantly running in the background, S Mode ensures your system is always equipped with the latest security patches.
Security vs. Functionality
While the security features of S Mode are commendable, the limitations can be a dealbreaker for many. For starters, you’re confined to the Microsoft Store, which doesn’t always have the apps you need. Applications like Chrome, VLC Media Player, and many professional tools simply aren’t available.
This restriction can also lead to compatibility headaches. Imagine needing a specialized app for work or school, only to find it’s incompatible with S Mode. For gamers, it’s equally frustrating to be locked out of popular platforms like Steam or Epic Games. These limitations quickly add up, leaving users searching for a way out.
Preparing to Disable S Mode
1: Check Your Device
Before you can break free from S Mode, it’s important to confirm if your device is currently running it. Here’s how:
- Navigate to Settings: Open the Start menu, click on the gear icon to access Settings, and go to System > About.
- Look for Windows Specifications: Scroll down to the “Windows specifications” section. If you see something like “Windows 11 Home in S Mode,” you’re in S Mode.

Once confirmed, ensure your device is connected to the internet. You’ll need a stable connection to download updates and complete the switch. Whether it’s a Wi-Fi network or a wired internet connection, make sure it’s reliable to avoid interruptions.
2: Backup Important Data
Although disabling S Mode is generally seamless and doesn’t delete existing files, it’s always better to be safe than sorry. Imagine losing a critical document or cherished photo due to an unexpected hiccup! Backing up your data ensures peace of mind.
Use a cloud storage service like OneDrive, Google Drive, or Dropbox to store your files securely. Alternatively, you can opt for an external hard drive or pendrive to create a physical backup. It’s a small step that can save you big headaches later.
Step-by-Step Guide to Disable S Mode in Windows 11
Step 1: Access the Microsoft Store
- Open the Start Menu: Click the Start button at the bottom-left of your screen or press the Windows key on your keyboard.
- Search for Microsoft Store: Type “Microsoft Store” in the search bar and select it from the results. The Store icon resembles a shopping bag with the Windows logo.
Step 2: Find the Switch Out of S Mode Option
- Use the Store’s Search Bar: Inside the Microsoft Store, click the search icon (a magnifying glass) at the top-right corner.
- Locate “Switch Out of S Mode”: Type “Switch out of S Mode” into the search bar and select the result.

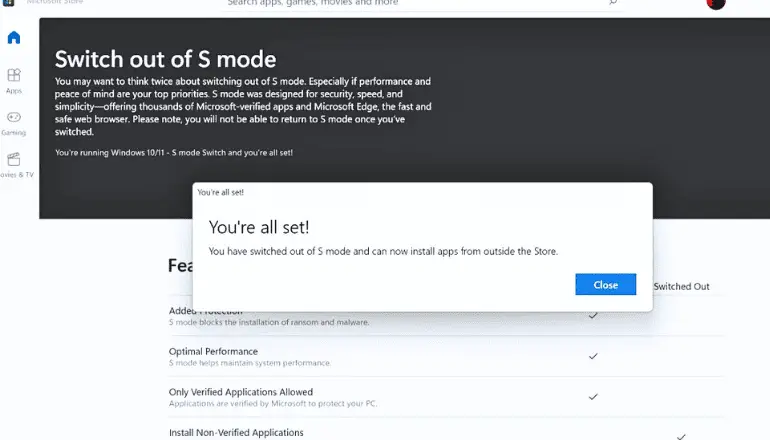
Step 3: Disable S Mode
- Click on “Get”: After selecting the “Switch out of S Mode” option, click “Get” to start the process.
- Confirmation of Success: Once complete, a notification will confirm the switch. You can verify by returning to Settings > System > About, where the “Edition” section will no longer mention S Mode.
Verifying the Change
To ensure S Mode is disabled:
- Return to Settings > System > About.
- Check the “Edition” section. It should now read “Windows 11 Home” or “Windows 11 Pro,” indicating you’ve successfully exited S Mode.
Now that you’re free from S Mode’s restrictions, you can install apps from any source. For example:
- Download the installer for your desired software from its official website.
- Follow the on-screen instructions to complete the installation.
Remember to always download from reputable sources to avoid malware risks.
Error Messages During the Process
If you encounter issues while switching:
- Check your internet connection. A stable connection is critical.
- Ensure you’re logged into an administrator account.
- Restart your device to resolve temporary glitches.
FAQs
Can I switch back to S Mode in Windows 11?
No, once you’ve disabled S Mode, there’s no way to return. This is a permanent change, so consider your long-term needs before making the switch.
Will disabling S Mode affect my device’s performance?
Potentially. While you’ll gain access to more apps, installing resource-intensive programs might impact performance on lower-end devices.
Are there any risks involved in disabling S Mode?
Yes. Without S Mode’s protections, you’re more exposed to malware and unverified software. Practice safe browsing habits and consider installing antivirus software.
Wrapping Up
Disabling S Mode opens up a world of possibilities for your Windows 11 device. You’ll gain the freedom to install a broader range of applications, tailor your computing experience, and enhance productivity. Just remember: with great flexibility comes great responsibility. Always prioritize security as you explore your device’s new capabilities.