CMOS Battery Replacement Process (5 Steps with Pictures)
So far, if you identify that the motherboard’s CMOS battery is dead, you can replace it by following the procedure and knowing the correct steps, you can replace the motherboard battery yourself.
Why does Motherboard need CMOS Battery?
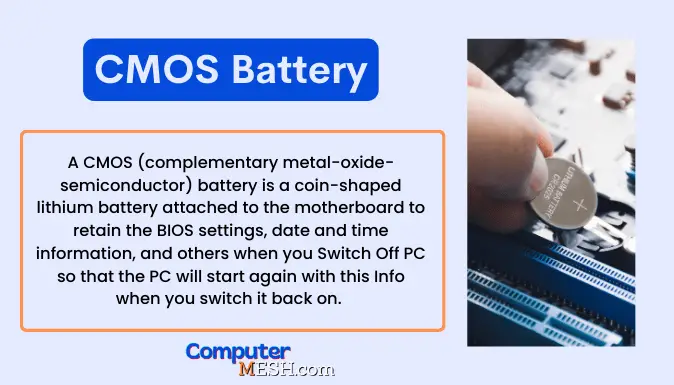
A CMOS (complementary metal-oxide-semiconductor) battery is a coin-shaped lithium battery attached to the motherboard to retain the BIOS settings, date and time information, and others when you shut down and restart the computer.
It is an essential element in saving information related to BIOS Legacy or UEFi. When it is disconnected from the power supply after the PC is turned off, it will be supplied with electricity by this battery so that the information is not lost.
CMOS differences between Laptop and desktop PCs
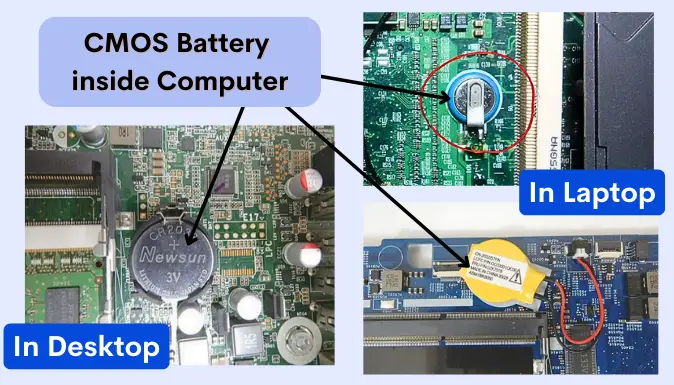
In the case of a desktop, it is easy to replace as it is a button battery.
This button-type battery is much more compact than a typical dry cell battery and can maintain a stable voltage until the end, so it is often used in precision equipment.
The situation is a little different in the case of a laptop computer. Some models use the same button-type battery installed in the socket as on the PC.
In other models, manufacturers put the same battery, but not in a socket, but simply hang it on wires with a block – let it “flop around”.
Sometimes, CMOS is soldered directly to the motherboard, which can’t be replaced without soldering equipment.
Before you proceed further, you can read if you want to confirm whether the CMOS battery failed in your case, which I mentioned in a previous post explaining 6 Common Signs of CMOS Battery Failure on the Motherboard.
CMOS Battery Replacement Procedure
Let’s perform the steps to replace CMOS battery carefully.
Step 1. Turn off the computer and unplug it
Turn off your computer and unplug the cable from the outlet and PSU wires before starting. It is safe to remove all USB devices, just in case.
If you do this while the power is on, there is a risk of damage to the computer, parts, or electric shock.
Step 2. Locate the CMOS Battery inside the PC Case
Computer cases are secured with screws. Remove them. After removing the PC case, gently sort the wiring inside while looking for the battery (use anti-static gloves to prevent static energy).
CMOS is a circular button-shaped object with a diameter of about 2 cm, and it is generally placed near the center of the board and visible from the outside.
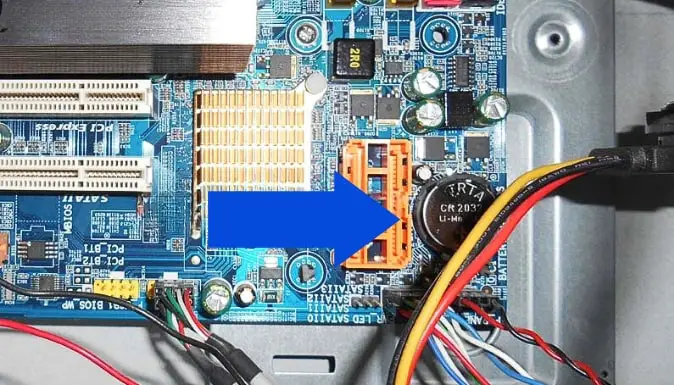
Depending on the structure, it may be behind the PSU or SATA data or power cable, so if you can’t see it in the center, remove other things and check.
Step 3. Check the Installed CMOS Battery type
Once you’ve found the battery, it’s time to check the battery type.
Many motherboards use a CR2032 model type, but some computers may use a different battery. Even if they look the same at first glance, there are many types.
For example, CR2025 or CR2016 are thinner in size than the standard ones (2.5 and 1.6 mm versus 3.2 mm for the CR2032), which means you can’t install different battery models, so be careful not to confuse them.
If you buy the wrong one, you will have to buy it again, as installing the wrong model battery can cause a malfunction.
For instance, if the button battery CR2032 is there, purchase the same battery for around a couple of dollars at electronic stores. Depending on the store, you can even buy it at a low price.
Step 4: Remove the CMOS battery
After getting a new CMOS battery (as long as the model number is the same, the button battery manufacturer does not matter.), you can finally move on to the replacement work.
Press the battery holder clasp outwards, and remove the battery when it pops up or press down on one end of the battery. When the opposite end pops up, remove the battery.
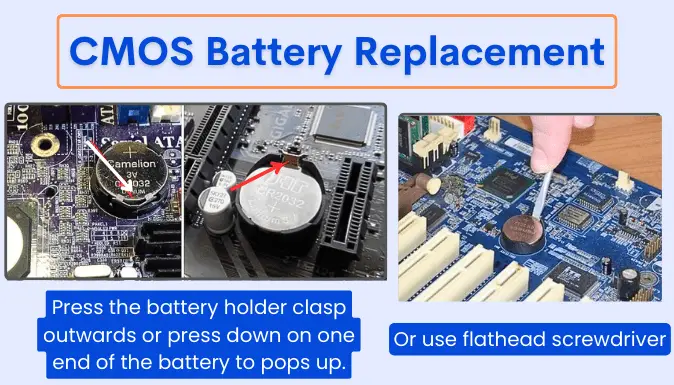
Since the button battery can be removed easily. If it is difficult to remove, hook a thin, hard object such as a flathead screwdriver or ruler on it to make it easier to remove.
Step 5. Install the new CMOS Battery
Install the new battery so the side with the print is on the front, and check the battery orientation of the positive and negative sides, set similarly as the old one placed.
It is OK if it is pushed in and clicked.
You can replace it with your bare hands but remember to take measures against static electricity.
After rechecking, screw the case back on, and you’re all set. * Before closing the lid, make sure that the internal cables are not disconnected. It is the time also you get to clean any dust on fans and other internal parts.
Last Step: Leave the CMOS to Clear up the Info
By clearing CMOS, you can reset the BIOS setting information and solve problems such as “OS won’t boot” or “PC freezes and doesn’t work”.
To clear CMOS, just wait a few minutes after replacing the motherboard battery because some electricity will remain in the motherboard itself, so you can’t clear the CMOS immediately. Leave it for 10 to 20 minutes so the CMOS clear initializes.
You can perform a CMOS clear and remove the BIOS information by doing so.
Is there a quick way to clear CMOS?
If you want to “clear CMOS immediately”, you can use the reset function in the motherboard to clear CMOS in seconds. The method uses the jumper pin next to the battery’s part on the motherboard.
The jumper pin is covered with a cap, and if you move it to the side, it will forcefully discharge the remaining power.
This will allow you to clear CMOS in seconds. After you’re done, put the cap back in place. However, this method is complicated for people unfamiliar with battery replacement or computers, so if you are not confident, I recommend leaving it for a few minutes to discharge.
Sometimes, the BIOS settings might be reset to default after replacing the battery. Enter the BIOS setup (usually by pressing a key like F2, Del, or F10 repeatedly during startup) and verify that your settings are correct. Set Date and Time: If the date and time are incorrect, you must manually set them in the BIOS. If you’ve made any changes to the BIOS settings, save those changes before exiting the BIOS setup. Usually, you’ll find an option to “Save and Exit” or something similar.
Another option is to leave the repairs to the professionals.
Even beginners can replace the battery on the motherboard from the above steps. Still, depending on the computer, it is installed in a space-saving manner, and it may not be possible to find the battery installation part.
Especially, it is more complicated to replace the CMOS cell in a laptop. Not all manufacturers provide easy access to the battery, requiring experience, skills, and sometimes a unique tool. It is best to ask a professional if you are unsure.
Just because it’s just a motherboard battery replacement, it’s worst for a computer beginner to do without knowledge. Troubles related to the motherboard are difficult to repair, and if you fail, you may fall into an irreparable state, and the repair cost will be higher than expected.
Therefore, if you are a computer beginner who does not have a way to replace the motherboard battery, you should ask at a computer repair center where it is done at a minimal cost.
CMOS Battery need regular replacement
As long as the PSU cable is plugged into the computer, power gets supplied to the BIOS. However, when the cable is removed, power to the BIOS gets from the CMOS battery on the motherboard.
If this battery runs out completely, the information stored in the BIOS will be lost, so it is desirable to replace it regularly before that happens. Also you may face OS problems, like freezing cursor on BIOS or itself.
The life of the battery used in the motherboard is about 3 to 5 years. However, the life expectancy will vary greatly depending on the conditions of use.
It may expire in about two years if you use it with intense consumption (means less PC usage). Conversely, depending on the environment, it can be used without problems even after 5 years or more (Constant PC usage).
However, just to be sure, if it has been more than 3 years since the computer’s purchase date or the last battery replacement, it is better to pay attention to the condition of the battery on a regular basis.