Mouse Frozen on Laptop – How to Get Cursor Back on Laptop?
The touchpad is a lifeline on which laptop users rely. When the laptop cursor not working or becomes unresponsive, as was my experience with a Windows laptop recently, life can suddenly become incredibly frustrating! Especially when it comes to completing important tasks.
That’s why I’ve written this article to approach why your laptop cursor not working and how to get cursor back on laptop to run again in Windows.
Why is the laptop cursor not working, or the touchpad stops responding?
The following cases can be considered as the cause of the laptop cursor not working or the unresponsive touchpad:
- Touchpad functionality is disabled
- Problem with the touchpad driver
- The Touchpad surface is dirty
- An external USB device interferes with the laptop’s internal components.
- There may be some loose connections
- Trackpad’s hardware failed
First, make sure your computer is not frozen.
One of the reasons why the mouse frozen on laptop is that the computer itself freezes, this stops acquitting all operations, and the mouse cannot be moved.
To test this, press the start button and see if you get a response; if so, quickly hit [Ctrl] + [Shift] + [Esc] on the keyboard to open the Task Manager screen and end the program that seems to have a large; programs taking up too much memory.
If nothing happens on pressing the keyboard buttons, though, it’s best that you force shut down your computer by holding its power button for some time before attempting to restart it again – an easy check to one of life’s most annoying problems!
2. Function keys disable the touchpad!
Nine out of ten problems related to a non-functioning touchpad can be quickly fixed by using the hotkey.
Most laptop models have this feature that instantly lets you turn off and on your touchpad. Even if you don’t intend to disable it, it may happen that you have pressed this key by accident, which prevents the cursor from moving.
The process is quite simple to turn on the touchpad again: usually, this requires holding down the Fn button and pressing one of the function keys from F1 – F12 to do the job. For example, if the touchpad does not work on an Acer laptop, you need to press the Fn + F7 key combination.
These keys can vary by laptop manufacturer, and some laptops may even have a dedicated button for disabling the trackpad. But it’s easy to spot the correct key by looking at the touchpad icon marked on your keyboard.
To find the proper instructions, refer to your instruction manual or the manual on the official website. But don’t worry–here are some of the most popular laptop manufacturers’ key combinations:
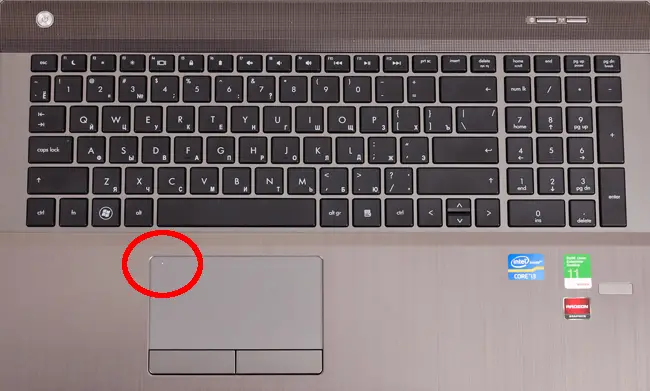
HP, as well as some other laptop manufacturers, prefer to move away from the standard Fn + Fx key layout and bring the touchpad power button directly to the touchpad; it is located in the upper left corner and has a light indication for ease of use. To enable/disable the touch panel, you must double-tap on the button, which is also touch-sensitive.
3. Is there another mouse connected?
Many prefer the comfort of movement offered by the external mouse instead of the touchpad. But this does not mean disabling the touchpad… After connecting your device with a mouse, your laptop’s touchpad may be disabled automatically – something many users are unaware of!
If you want to use the touchpad even when the mouse is connected, modify the setting:
- Go to your Windows Settings.
- Then head over to the Devices section.
- Then access the Touch Panel option.
- The next thing is to look for a box that says, “Leave the touchpad activated when a mouse is connected”. Check this box.
- Now you can Accept and Close.
Everything should be fixed now, and the mouse and touchpad should move the cursor and work fine.
4. Clean the touchpad
The touchpad is highly sensitive to moisture and dirt; if its surface gets dirty or contains moisture, it may not move or stop the cursor from responding or may behave differently than expected. Water droplets, oily hands, or sweat reduce the effectiveness of the touchpad and, in the worst case, lead to failure.
Here’s how to clean the touchpad:
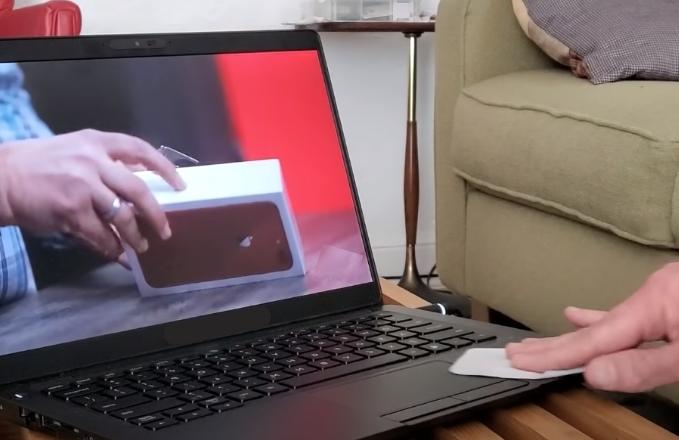
It’s an easy method and doesn’t require difficult work such as disassembly or removal of parts, so it might be a good idea to try cleaning it for the time being. Of course, diligent cleaning is effective, but it is also recommended to operate with clean hands regularly and clean dust often.
4. Update the touchpad driver
Your laptop cursor not working may also be because of a latest driver absence in the system (usually, this happens after reinstalling the OS, recovery operations, updating drivers, etc.). Even though the new Windows 10 (and usually 11) always automatically installs “its own” drivers when any devices are connected to the system, they do not always work accurately.
In such cases, updating or reinstalling the touchpad driver may be effective. In particular, when checking the device manager, be careful if there is a mark such as “!” in the item corresponding to the touchpad. If the “!” effect appears, an error has occurred in that device.
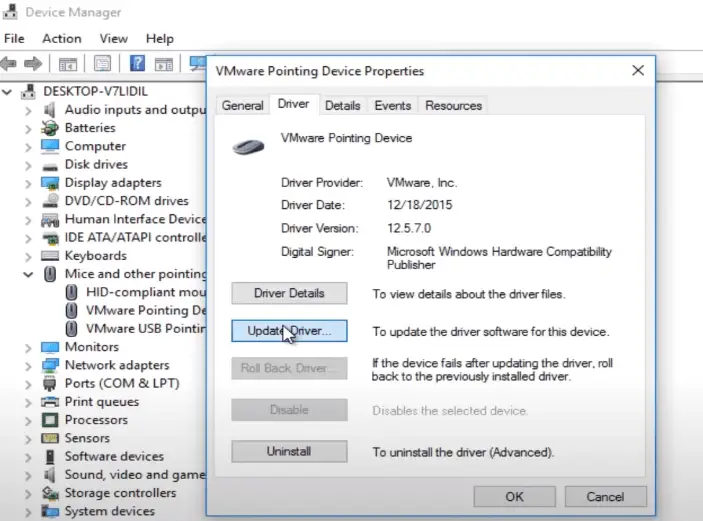
Update your touchpad driver by following these steps:
- Right-click the Windows mark and click Device Manager.
- The Device Manager screen will open.
- Expand “Mice and other pointing devices”.
- Right-click on “Touchpad Name” and select “Update Driver” > Search automatically for updated driver software.
5. Touchpad may be disabled in BIOS/UEFI.
The phenomenon is less common than the previous ones but also sometimes occurs – disabling the touchpad in the BIOS. In some cases (especially after a laptop battery breaks), the BIOS settings get lost when the device is suddenly turned off or when a new operating system is installed.
To find this problem, go to your laptop’s BIOS. You can access the BIOS settings at the boot stage by pressing a specific key on your keyboard. The key depends on your BIOS manufacturer; it is usually one of these keys: Del, Esc, F1, F2, or F10.
Next, you should find the menu item responsible for enabling/disabling the built-in pointing devices, “Touchpad” (in my case, it is located in the Advanced section).
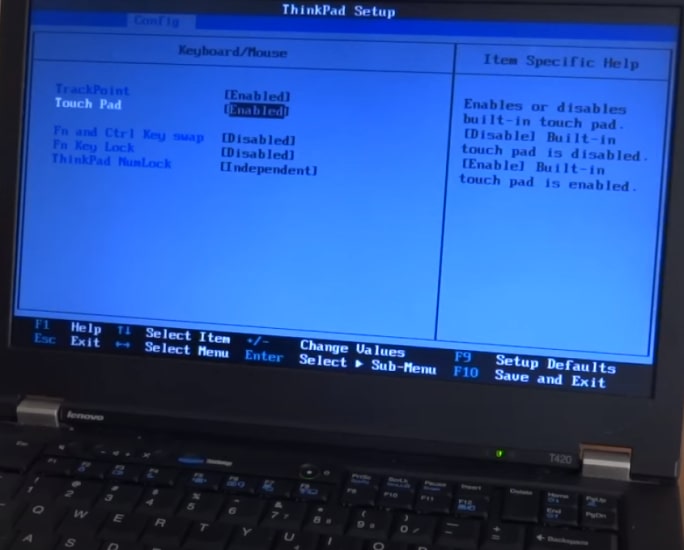
Touchpad operation is possible when set to “Enabled”, i.e. “Enabled”; if the set value is “Disabled” – the touchpad is disabled, then you need to change it to Enable.
Important! Do not forget that when changing BIOS settings, you must save the settings made. Otherwise, the touchpad will remain disabled. All actions in the BIOS must be performed without haste so that when solving a problem with the touchpad, you do not create a new one. To activate or deactivate your touch panel all you need is two taps on the sensor-sensitive button.
Of course, depending on the laptop model and BIOS version, your menu may differ slightly from my example. Be that as it may, see if you have a device called “…pointing…” (or “… Touchpad”). If the instruction manual has been preserved, it may contain a decoding of all the parameters of your BIOS / UEFI version.
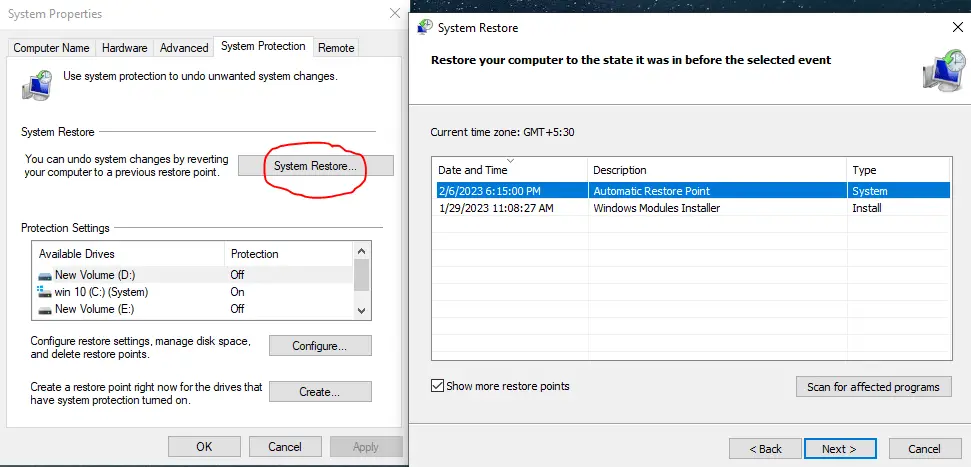
6. Restore your windows to the previous date.
If none of the above works for you and still laptop cursor is not working, it may be we can’t recognize what issue is causing this problem on your computer, and the last thing resort is to restore the previous restore point and see if it laptop cursor start works as before.
To use a restore point: open Create a restore point by searching in the search bar > Now click on System Restore in the System Protection Tab > Next > Select the Previous Date and Time of restore point (when the laptop cursor was working perfectly fine) > Next > Finish.
Your laptop will restart. And make sure to take a backup between the period.
7. Hardware Failure Problem
If your laptop cursor not working still after going through all the above fixes, there is a good chance that the trackpad hardware damage has taken place.
For example, liquids such as drinks may have been spilled on the touchpad, mechanical damage to the panel, the high internal heat may have harmed parts or computer sensors, or if you carried out repairs previously and didn’t use the touchpad after it, then there is a chance that it’s just a disconnected cable.
Touchpad failure cannot be confirmed without diagnosing the computer itself – you’ll need to send it off for repair at a technical service centre in order to get definitive answers and solutions!
Tip – Have an External Mouse Available
Even if you have been struggling with this issue for a while and are confident that you will fix it, it is always useful to have an external mouse available. This can save you a lot of unnecessary hassle in case the touchpad problem persists!
You may prefer to use a wireless mouse if you are more mobile. In this case, make sure to get one that is compatible with your laptop.
Conclusion
If you’ve tried all the solutions and it still doesn’t work, your hardware may be failed.
Even if you suspect your mouse is malfunctioning, you can use the Mouse Keys function to perform operations on the screen temporarily. In the unlikely event that you cannot use the mouse, do not panic.
In most cases, the failure is software and fixable by the user himself; if you suspect the cause is in the hardware, you should contact the service centre.
Remember that disassembling the device is easy, but putting it back together correctly will not be easy. With this ends our article on guide to Laptop cursor not working. Remember that you can share it on social networks so that it can help more users who need it.