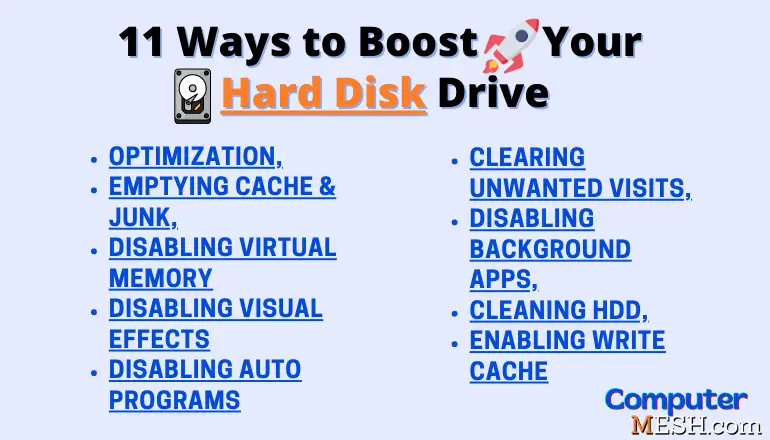
11 Effective Ways to Speed up your Hard Disk Drive Instantly.
It is still true that hard drives, as a storage option, are no longer the faster hard drive in themselves. But it is also obvious that it is the most widespread choice among all desktop users. Many of them wanted to speed up their hard disk drive.
Do you usually install a lot of programs? transfer large files? Or delete a lot of files? If you give intensive use to HDD it is possible that each time you notice it slows down, and problems begin.
You don’t need to worry as you can easily speed up your hard drive by following proper methods and stay away from those issues that hinder your hard drive processing speed.
What makes the hard drive slow down?
The hard drive is one of the vital part that most affects the performance and experience of using a computer. However, even the largest and quickest hard drives can turn out to be slow, so what makes hard drive slower?
The following are the most well-known reasons of hard drive slow down:
How to speed up Hard Drive?
There are a series of ways that you can use to faster your hard drive significantly. So that, HDD doesn’t lose excess performance with the use we give them.
As a note, you have to keep in mind that in this article, I am going to talk about mechanical hard drives and not SSD, since the optimization for these storage units contrasts a great deal from what we will see next.
So let’s move forward to look at the ways on “How to speed up your hard drive to run faster?”
1. Optimize Drive
The computer stores the files in individual data blocks and reads them when necessary. However, over time, as information is erased or existing documents are re-saved, the arrangement of these fragments gets disarranged.
These processes separate the contiguous blocks from one another (fragments are made), which reduces the reading speed. At the point when you defragment the hard drive, the information is reorganized, allowing you to speed up the hard drive and make it work quicker.
It is advantageous to utilize this program periodically, this improves the speed as well as the life expectancy of the hard drive but not Defrag SSD. Windows incorporates a good hard disk defragmenter, To run it you simply open it by searching “Defragment and Optimize Drives” in the search bar.
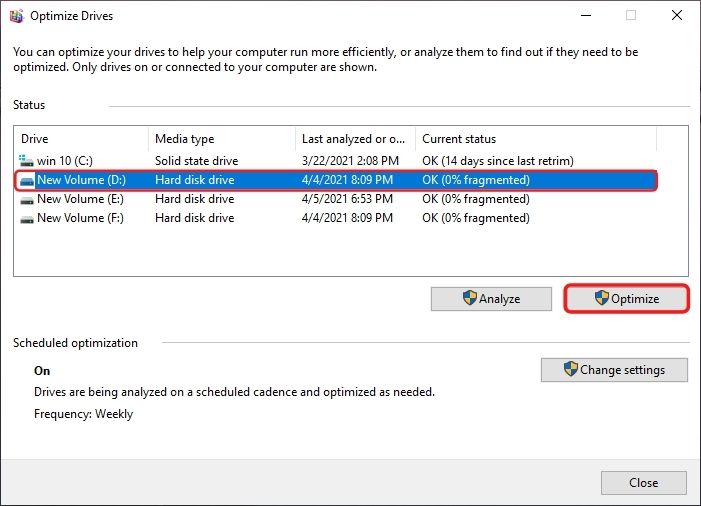
In the new “Optimize Drives” dialog box, select the desired hard drive with a left-click and start the defragmentation process by clicking the “Optimize” button.
You must bear in mind that the disk defragmenter can take from a few minutes to an hour to perform the operation, this will depend upon the size and degree of fragmentation of the disk.
However, you can keep on to use as long as you normally do, so don’t be afraid to run these tasks periodically in light of the fact that they will just do your system good.
Note: It is important that you don’t use your computer while the defragmenter is working because it is working on your hard drive and you could interfere with its task and harm your system.
2. Empty the cache and remove junk data
Every computer system has a so-called cache memory: a buffer memory where programs store data to quickly recover it at any time.
In any case, this memory can contain pointless information that burdens the system. Therefore, perhaps the main measure to speed up the hard drive is to regularly clear the cache & .dmp file.
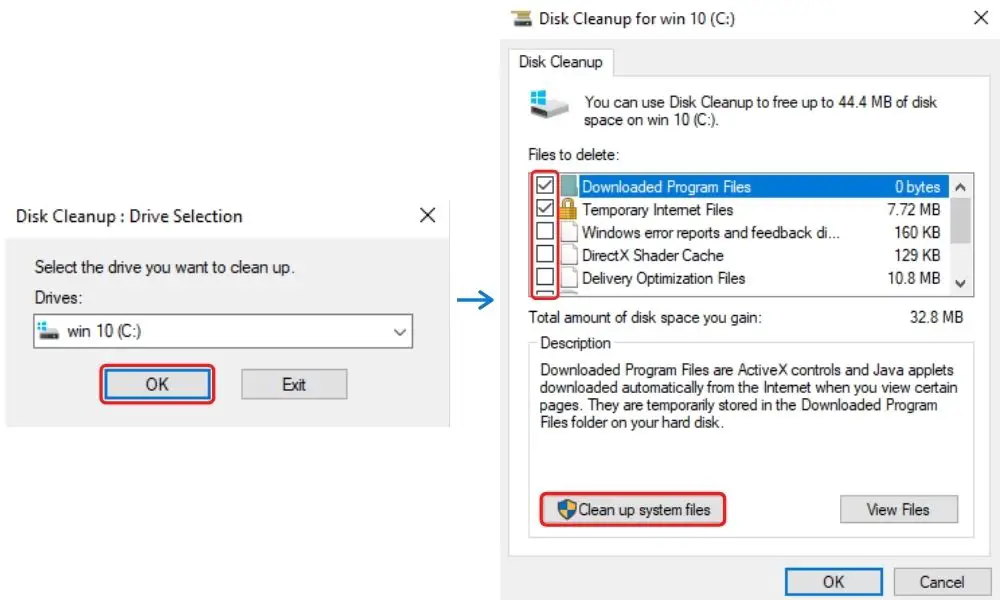
- Type “Disk Cleanup” in the search bar and select the corresponding result.
- Select the drive you want to clean and confirm the selection with “OK”.
- Windows 10 automatically calculates how much memory the cleaning process can free up. You also have the option to choose and erase files manually.
- Select the files you want to delete and confirm with “OK “.
- So you can free up disk space and speed up your hard drive.
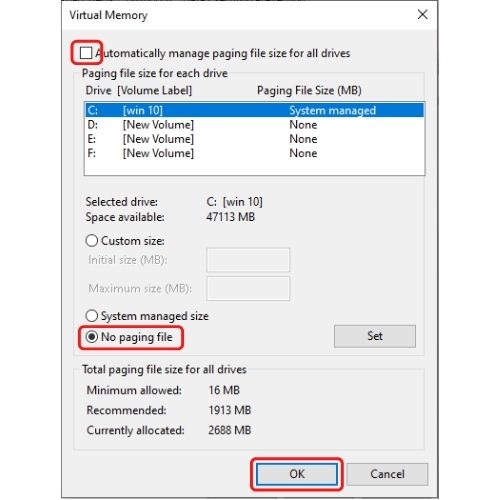
3. Disable virtual memory
In Windows 10, virtual working memory is enabled by default. It is used when the primary memory (RAM) is already completely occupied.
Nonetheless, if your Windows PC doesn’t have an SSD, the use of virtual memory adversely influences performance. For this situation, it is recommended to disable this extra memory to speed up the process of the hard drive.
- Type “View advanced system settings” in the search bar and open it.
- A “System Properties” dialog will open, with the selected tab “Advanced Options”.
- In the “Advanced Options” click the button “Settings”, in the “Performance” section.
- The “Performance Options” window will then open. Click again on the “Advanced” tab and then on the “Change” button, in the “Virtual Memory” section.
- First, uncheck the “Automatically manage paging file size for all drives” option. At that point select the option “No paging file.”
- To accept the settings and deactivate virtual memory, confirm the selection by pressing the “OK” button.
4. Disable visual effects
Windows 10 isn’t just recognized from archetype by its specialized innovations, but also by its elegant appearance, which includes numerous visual effects: animations, edge refinement, and display of window shadows, among others. However, these impacts require processing power.
If your computer’s performance decreases, it may be advisable to disable them. While disabling does mean missing some design elements, you will benefit from the increased performance. In the performance options, you can enable or disable individual effects:
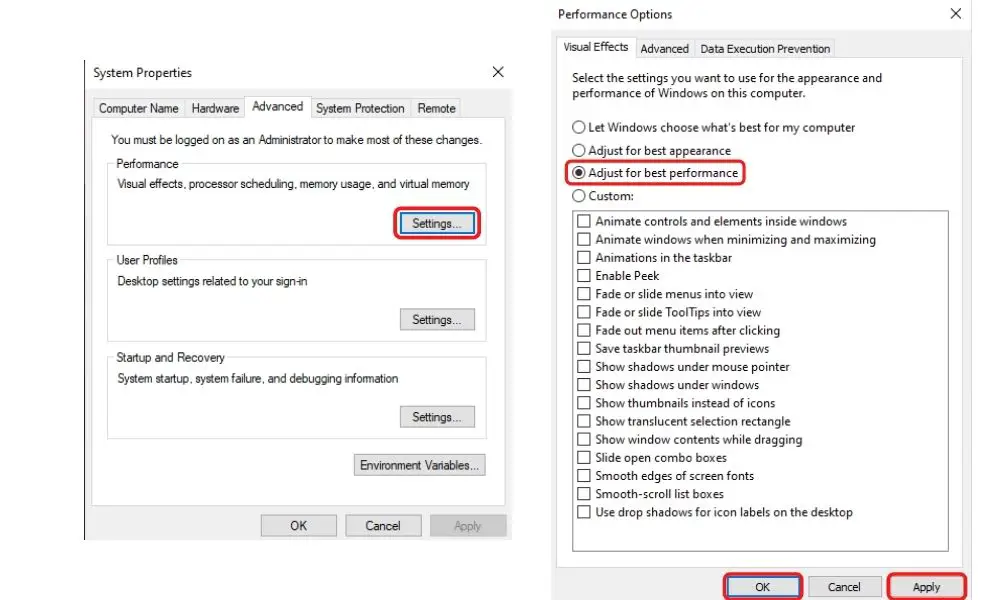
- Type “Adjust the appearance and performance of Windows” in the search bar open the result.
- The window of “Performance Options” will open.
- Select the option of “Adjust for best performance”. In this way, Windows will focus on performance over visual effects. You additionally have the choice to set custom settings only if you know the settings. To do this, manually select only if you know the effects that you want to be displayed.
- To finish, confirm with “OK” and then “Apply”.
5. Disable auto startup programs
When you start up your Windows computer, some enabled programs start automatically. This function is especially helpful for programs that you use consistently. However, programs that you don’t require or rarely use often sneak into autostart.
These applications run in the background after automatic startup and therefore occupy valuable memory space. Therefore, Windows offers the ability to modify the list of autostart programs in Task Manager.
Follow the instructions to disable automatic program startup and speed up Windows 10.
- Open the Task Manager with the key combination [Ctrl] + [Shift] + [Esc].
- Select the “Startup” tab.
- The Startup tab displays a list of all the programs that indicates whether automatic start is enabled or disabled for each program. Look in the list for processes that you don’t want to start automatically when you turn on your computer.
- To change the status, right-click on “Enabled” or “Disabled” in the corresponding row and select the ideal option from the context menu.
- You can also click with the left mouse button on the respective program and then select ” Disable “in the lower right corner.
6. Enable write cache
The hard disk write cache is a NAND Flash memory chip that is included in our hard disk. Data is stored there before being physically recorded on one of the drive’s platters. Therefore, having it activated will consistently expand the performance of our disk.
To check if you have it activated or not, you should do it through the Device Manager.
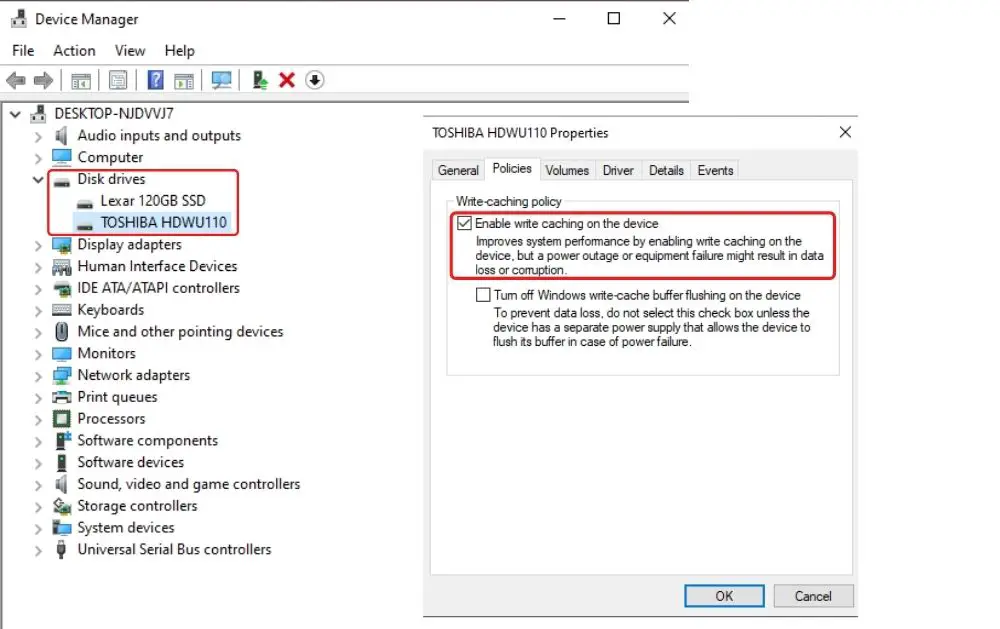
- To open it, you first have to open the Device Manager.
- Now navigate DIsk drives click on it and your hard drive.
- Open the policies tab check the option of “write caching policy” check if the hard disk write cache activated or not. In case is not enabled just enable press “OK”.
7. Disable background apps
Windows constantly run a few applications behind the scenes to send data and notifications continuously, similar to when you use an email client. Be that as it may, this feature loads memory, which thus influences overall performance.
Luckily, in this sense, Windows also offers the option to manually control the running of applications in the background and to disable it generally or for some selected programs.
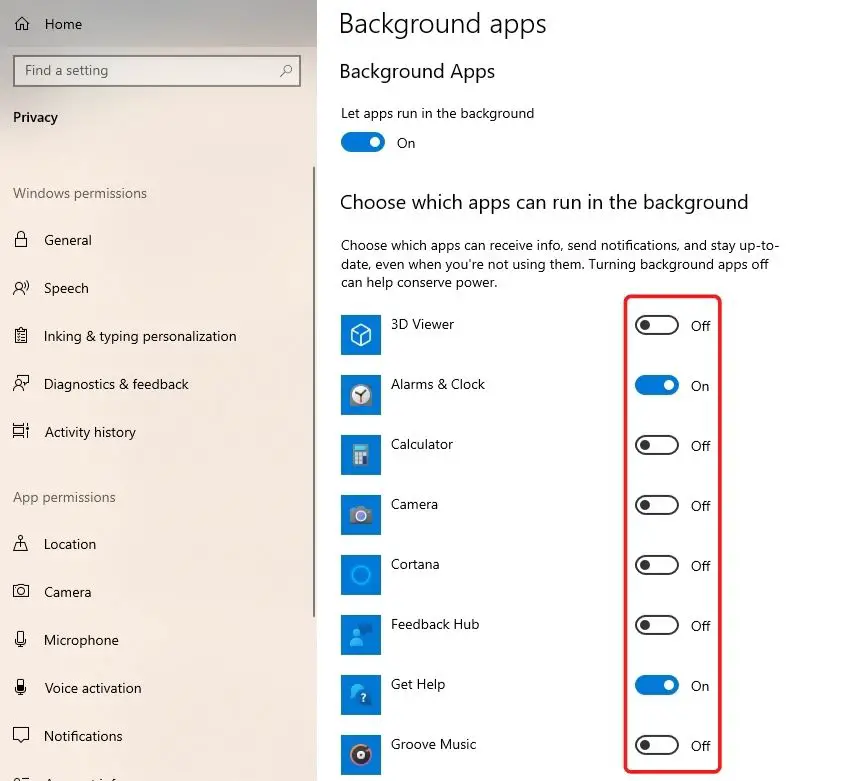
- Search for the “Background apps” on the search bar.
- Disable all those apps that you don’t use or don’t need essentially to run background.
8. Enable file indexing
Something that is frequently ignored, yet that truly affects the performance of hard drives, is the requirement for hard drives to have files indexed correctly.
To do this, the unit creates an internal file that allows it to know in which sector of each platter each file is stored. Very much like the record of a book. Then, when it comes to finding it, the disk consults this index and can move the read heads directly to the address where the file is.
To know whether you have indexing activated, you must see in properties of the hard disk drive, by just right-clicking on the icon of the disk.
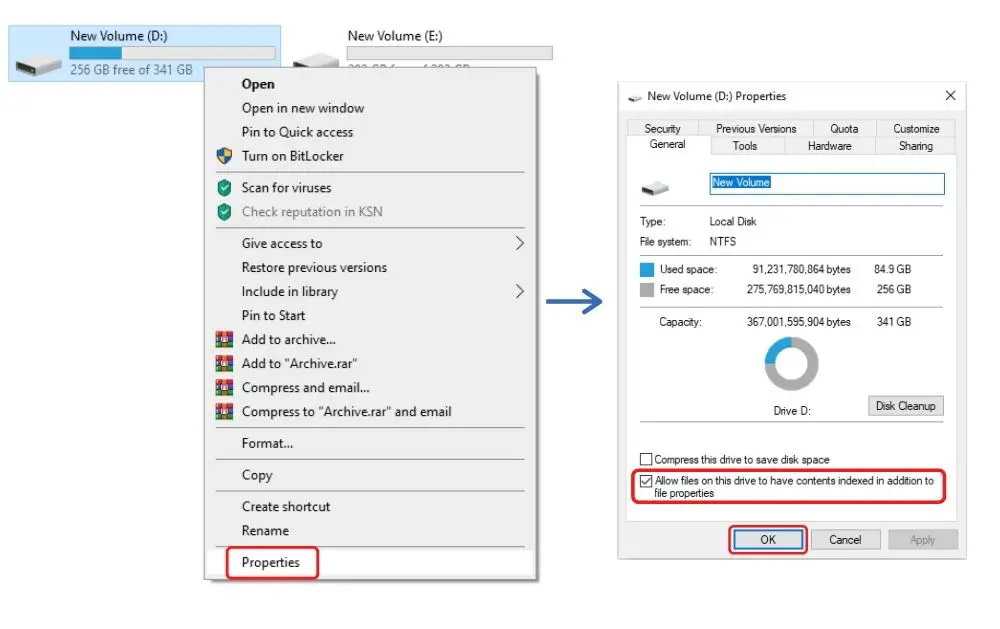
On the screen, you can automatically know if file indexing is activated for our unit. By default, Windows enables indexing for all storage drives, when introduced. However, it never hurts to ensure to have it activated.
9. The fuller, the slower
Hard drives have a bad habit of losing performance as they fill up. Fortunately, this process isn’t consecutive but exponential, so that the performance loss is not noticeable until the disk reaches approximately 90% capacity.
So if your disk is more than full of this security level, you will need to remove some of its content. A decent solution is to use the Windows space cleaner, which sees what unnecessary files are available on that drive and can be securely erased.
If this remedy doesn’t let free up all the space that it should, you will have to do the process manually, eliminating those files and programs that you do not use, the backup copies that have become old, or any other content that you no longer use in PC.
The Internet offers countless programs and tools that can be downloaded for free – a great temptation to try many different applications. However, programs occupy significant memory space regardless of whether you don’t use them, which can slow down your computer’s performance.
For this reason, it is advisable to regularly review the list of installed programs and applications. To accelerate the hard drive by uninstalling the unnecessary apps.
Tip: You can speed up the performance of our disk is by creating smaller partitions. In this way, you can organize and compartmentalize the files more. By making more partitions, the disk’s read and write heads don’t have to move as much, as if they have to search the entire surface of the hard disk.
10. Look for undesired visits
The advice that I can offer you if all of the above fails, it would be convenient to check if the hard drive has viruses or other elements that may harm its content.
To do this, You do not need more than your favorite antivirus, and it is also advisable to use an antimalware application, which thoroughly checks the hard drive in search of this sort of unwanted element.
11. SSD, the solution to almost all problems
In comparison with SSD, Using an SSD simplifies the optimization and maintenance of storage drives. And it ensures that startup or application loading times are minimized.
At least on the boot disk, having an SSD drive – a M.2 slot or SATA is suggested; 256 GB will be sufficient for the vast majority of the standard uses, although 512 GB is better as soon as you work with editing or authoring programs.
Also Read: How to Open Disk Management in Windows?
If the SSD is NVMe based on PCIe protocol, then it is better than SATA. In boot tests of SATA with an NVMe drive running on Windows 10, I got absolute boot times under 30 seconds versus 50 for the SATA drive.
In the case that gamers, few games even occupy hundreds of gigs, filling the available space rapidly. Obviously, you can have a second HDD unit where we install the titles.
The second drive, with more storage capacity, can be HDD. Prices per gigabyte are lower with this technology. In both HDD and SSD units, it is convenient to leave free space (20%) so that the read, write and erase operations can be carried out effectively.