How to Optimize SSD for Enhanced Performance in Windows 10
It is said that Windows 10 is, by default, optimized for SSD, but you still want to make some SSD tweaks to get enhanced performance out of your SSD. In this guide, I will show you how to optimize SSD in Windows 10 and debunk some common myths.
Not only speed, but it can also help to extend significantly SSD’s life. So, what are possible ways to optimize SSD? for gaming and increased performance? Let’s Read on!
But at first get answer,
Do SDDs Need Optimize or Enhancement?
According to manufacturers, solid-state memory drives do not need additional tuning or optimization in modern operating systems. As per Microsoft’s opinion, any manual adjustments can only slow down your drive or lead to system problems.
However, quite often, a situation may arise when an SSD with Windows 10 installed does not give the performance result that the user wants to expect. The reasons for this can be quite different. In such a case, users can intervene, optimize, and enhance the SSD disk.
10 Ways to Optimize SSD
1. Disable Local File Indexing
Drive indexing is a feature to speed up the search for local files. It is convenient on mechanical HDDs but not very worthwhile given the high speed of SSDs, or it’s just slowing down your system due to not-perfect indexing times.
Disabling file indexing will increase your drive’s speed but reduce the rate of file search. But Windows needs to crawl the entire SSD drive every time you use the search function, taking some time and a load on a processor, even on SSDs.
Thus, If you don’t use search often for documents and files, you can disable it, enhancing the SSD performance by saving a few write cycles and extending the life.
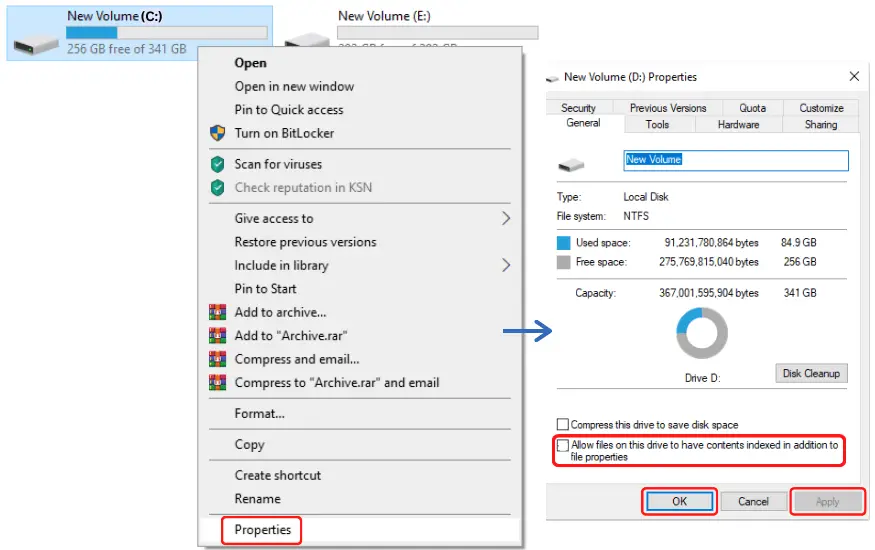
To disable the drive index, navigate to File Explorer This PC > C Drive (yours SSD drive) > Right click on drive to select Properties. Now uncheck the “Allow files on this drive to have contents indexed in addition to file properties” in the General Tab.
After disabling this, remember to delete the index file too. Although it is not essential, if the SSD capacity is small, it is suggested to delete it to free up space.
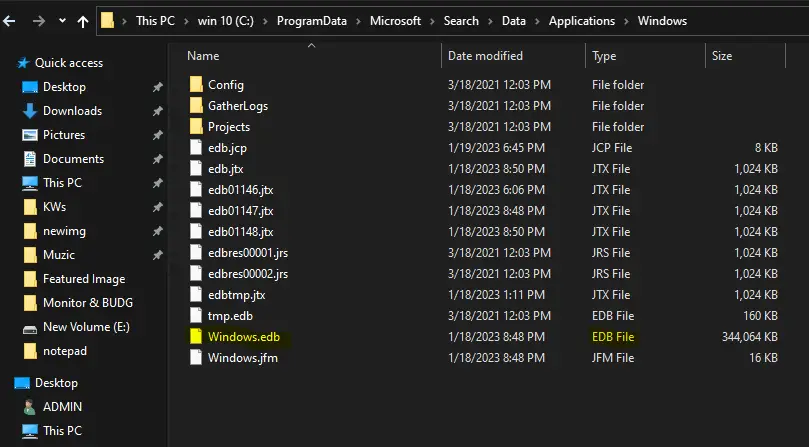
To delete, open the index file location in explorer by navigating C:\ProgramData\Microsoft\Search\Data\Applications\Windows. Here delete Windows.edb file.
2. Make Sure TRIM is enabled (SSDs’ Defrag)
You must have done “disk defragmentation” to properly organize and arrange your HDD storage space when it slows down.
However, since defragmentation is only for mechanical hard disks, Windows 7 and later operating systems do not defragment for SSDs as they shorten their lifespan. Instead, a tool called “trim” runs periodically and eliminates file fragmentation stored on the SSDs to prevent performance down.
With TRIM enabled, the OS deletes unused data blocks and immediately erases them internally. As a result, writing to those blocks can be as fast as a new drive, greatly accelerating SSD performance and maintaining life by notifying SSD of writable areas.
For this, you shouldn’t need to change any settings, but… only you need to ensure it is enabled by default since Windows 7, yet it may have been disabled for some reason. To check:
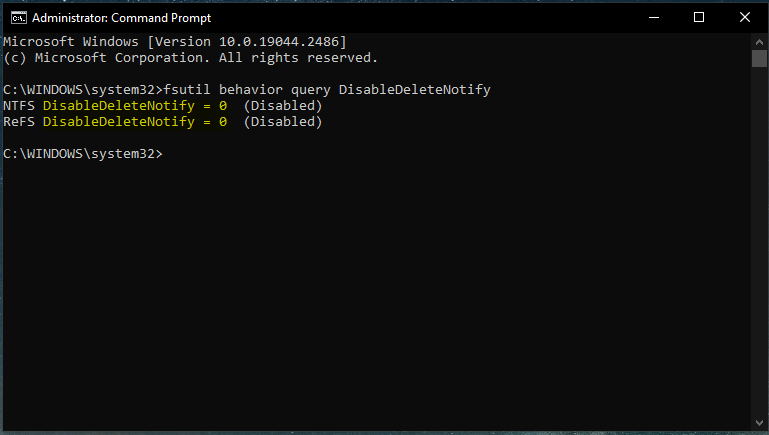
Run CMD as administrator and type or copy paste this: ‘fsutil behavior query DisableDeleteNotify’ and press enter.
TRIM is enabled if the cmd shows the result for NTFS and ReFS: DisableDeleteNotify = 0.
But if the result is 1 instead of 0, you have to manually enable it by typing both ‘fsutil behavior query set DisableDeleteNotify NTFS 0’ and ‘fsutil behavior query set DisableDeleteNotify ReFS 0’ press enter after each command.
3. Switch to AHCI (Advanced Host Controller Interface) mode
The AHCI (Advanced Host Controller Interface) is crucial for Windows to favor SSD so that it delivers more. Switching from RAID or IDE mode to AHCI mode, the latest technology NCQ will be applied to optimize the performance of SATA type of SSDs.
When this NCQ is enabled, the SSD host controller analyzes data access and NAND data delivery to fully use the host controller’s bandwidth, which can significantly improve SSD performance.
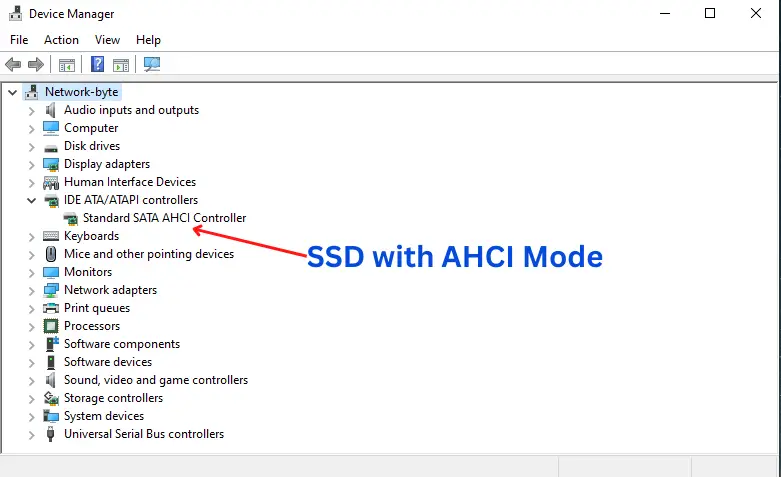
Most SATA controllers on modern motherboards are set to AHCI by default. To check, go to the Device Manager > IDE ATA/ATAPI Controllers > ‘Standard SATA AHCI Controller’.
If not, you must go into the motherboard BIOS Legacy or UEFI and set the storage drives to AHCI mode.
Enter BIOS by pressing a key (usually F2 or DEL) when the computer boots. You can find the AHCI option within the BIOS settings, but it is generally in the Advanced Options or “SATA Operation” or “SATA port” > SATA configuration or storage settings section.
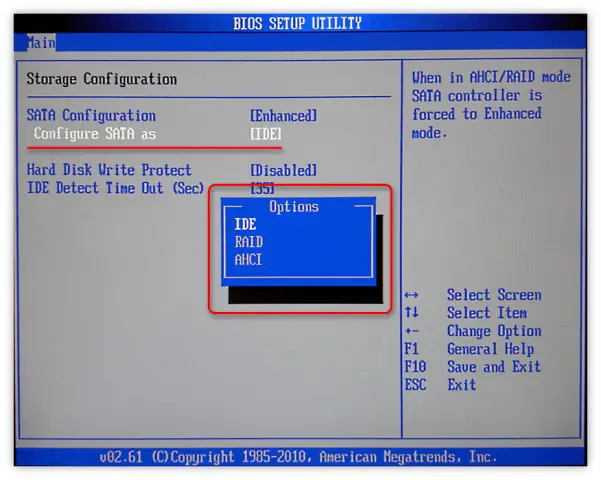
If this item is set to ATA or RAID mode, change it to AHCI. Press F10 to save changes and exit from BIOS.
It should be noted that not all motherboards support AHCI mode. Some models require a BIOS update to enable this mode.
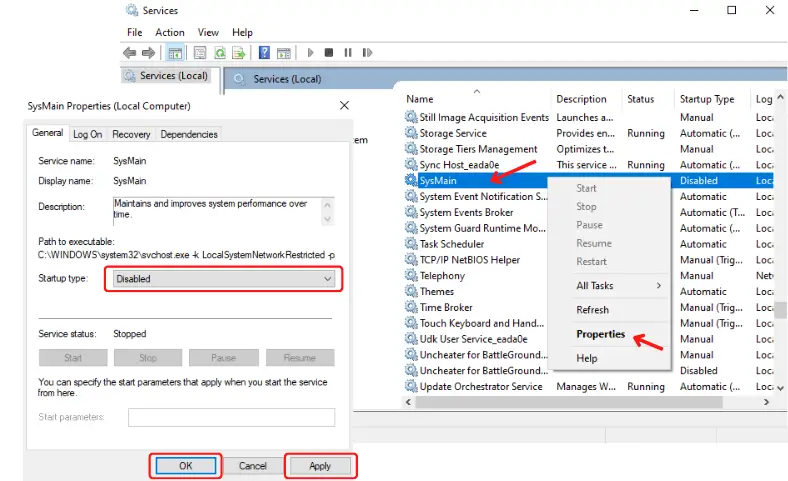
4. Disable Prefetch and SysMain (formerly superfetch)
Prefetch is responsible for copying files that have been recently opened and storing them in a contiguous area on the drive to serve quickly when a user access it again. Like the prefetch, super fetch also uses space to speed up that startup.
These features should be enabled with a mechanical hard drive to improve system performance but are not needed in SSD, as SSD is fast enough. So even if it seems to be enabled at first glance, it should be disabled. By disabling it, you will slightly reduce the PC’s RAM consumption and save some write cycles on our precious SSD.
To disable Superfetch (aka SysMain), open services from the Search bar, locate the name “SysMain” right click to open properties, and set the startup type to ‘Disabled.’
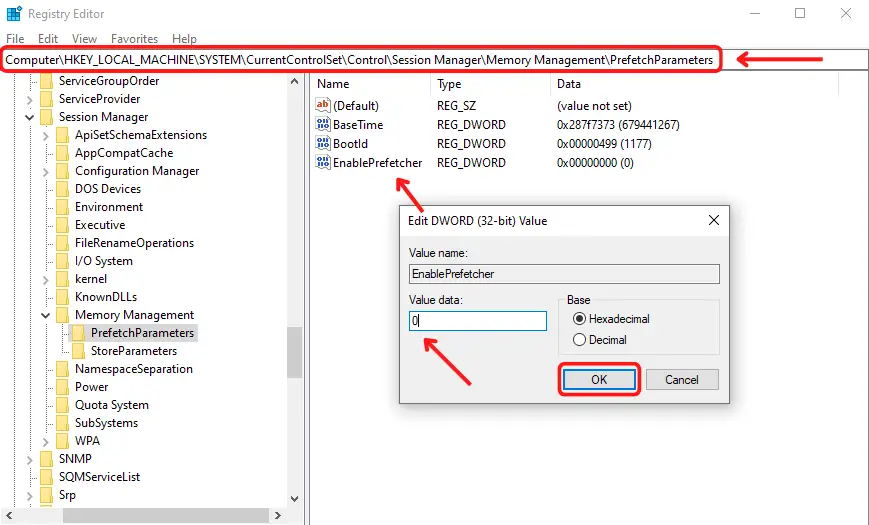
Open Registry Editor from Search and navigate or copy paste this: “Computer\HKEY_LOCAL_MACHINE\SYSTEM\CurrentControlSet\Control\Session Manager\Memory Management\PrefetchParameters” Here double click on EnablePrefetcher and set the value to ‘0’.
5. Turn off Hibernation
The next setup is — turning off hibernation. When the hibernation mode is enabled, the computer does not turn off completely: information about all running programs remains in active processes. Thus it will continue to save data to the SSD every time it goes into hibernation.
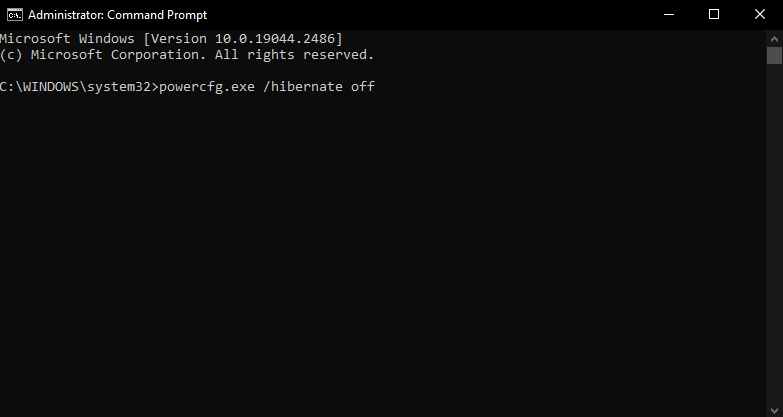
Disabling hibernation not only prevents SSD writes but also secures capacity, so if you do not hibernate, disable it.
To disable, Run CMD as administrator and type powercfg.exe /hibernate off and press the Enter key. Exit the Command Prompt window.
Note: Note that laptop users might not disable it. It is pretty helpful to quickly save important editing work, open programs, and documents without using power. For example, automatically turning off sometime after closing the laptop cover may cause inconvenience.
For desktops, disabling hibernation may make sense; frequent use of the hibernation mode negatively affects the SSD disk because the use of deep sleep leads to frequent rewriting, and it, in turn, spends disk rewriting cycles.
6. Disable Paging if you Have More than 16GB RAM
Virtual memory is a function that temporarily uses the capacity of your SSD as memory when physical memory (RAM) is insufficient. If you disable it, the free space will increase in GB units. If you have enough internal memory, 16GB DDR4/DDR5 RAM or more, it is better to disable virtual memory on your computer.
Generally, the pagefile (virtual memory) is created in the root directory of the system drive and requires several GB of free space. By disabling the pagefile, resizing (customizing) it, or moving it to a faster drive, you can improve the performance of your SSD and extend its lifespan.
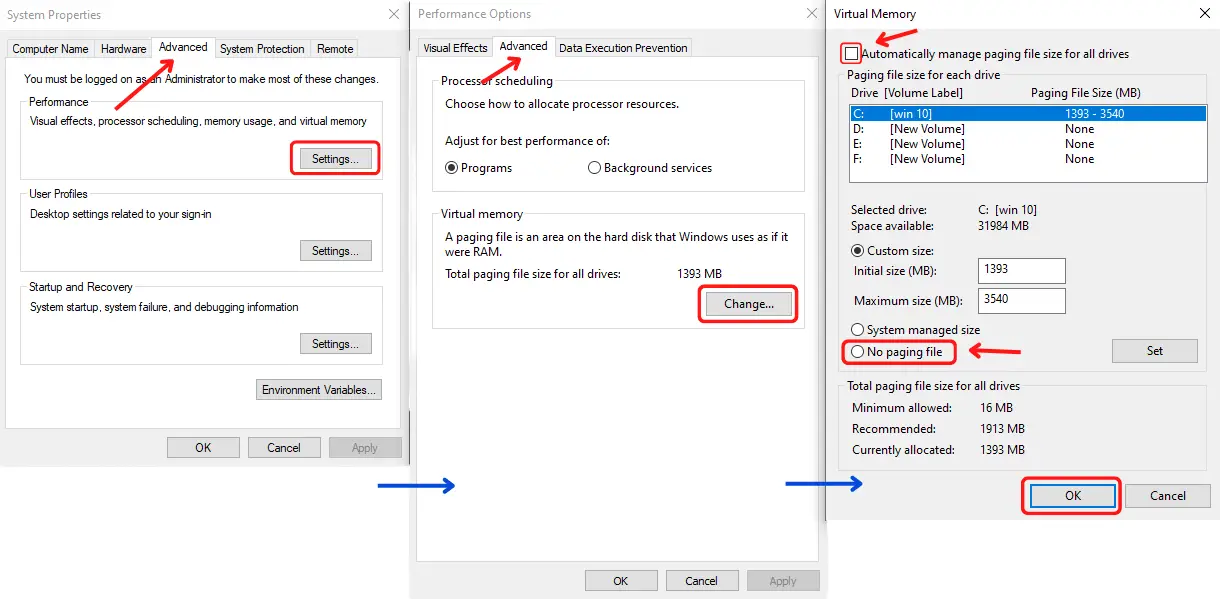
Type “View advanced system settings” in the search bar and open it.
A “System Properties” dialog will open with the selected tab “Advanced Options.”
In the “Advanced Options” click the button “Settings” in the “Performance” section.
The “Performance Options” window will then open. Click again on the “Advanced” tab and then on the “Change” button in the “Virtual Memory” section.
If you have 16GB or more RAM, uncheck the “Automatically manage paging file size for all drives” option and select “No paging file.”
Confirm the selection by pressing the “OK” button to accept the settings and deactivate virtual memory.
If you have 8GB RAM or less, remain it Automatically managed.
Because memory is installed, 8GB or less, the warning message “Your computer is out of memory” will appear even once; disabling it, in this case, isn’t recommended as it causes some apps and programs to stop working correctly. Instead, better to have it automatically managed.
7. Align SSD partitions
The partitions of the SSD drive must be aligned to improve performance. Regular HDDs and SSDs both require partition alignment. Still, for an SSD, it is crucial to ensure optimal performance and reduce write amplification.
A traditional HDD has 512-byte sectors, but an SSD that adopts NAND flash memory has 4KB (4096-byte) sectors.
So 4K alignment is necessary to get the best performance out of your SSD. After doing 4K alignment on SSD, it is evident that both reading and writing speed and score of SSD are greatly improved.
8. Install OS on SSD and Move data on HDD
SSD is always used as a system disk to shorten computer boot time and improve system running speed and data stability. Mainly, installing Windows OS from Windows 7 onwards on the SSD is always recommended.
One of the reasons for the pressure on SSD capacity is the increase in user data files. In particular, when much data, such as images and videos, increases, a small-capacity SSD will soon run out of capacity.
So what to do is store the data files on another SSD or HDD. For example, you can add a hard disk if you have a desktop computer. If you have a laptop computer, you can add a portable external hard disk and take your data.
To move data on HDD, plug in the HDD to your computer and drag your files into it. Then right click the file here and select “Cut.” Now go to the folder in your hard drive where you want to transfer these files and right-click inside this folder, and select “Paste.” The files should now be shared.
If you have the budget or space to add an SSD, it would be better to introduce a SSD for gaming, a dedicated SSD for editing photos and videos, etc., or an external hard disk for gaming and others.
Lastly, you can also use dedicated data transfer software to efficiently move large amounts of files from one drive to another. This will help to keep your SSD running at optimal speeds and help increase its lifespan.
9. Leave enough free space
Leave enough free space on SSD (especially C drive) for better performance. If your C drive runs out of space, Windows 10 will run slowly, which may also affect your data reading and writing speed. In general, keeping at least 20% – 30% of the total capacity of an SSD as unallocated space is recommended.
Having more available or unused space can increase performance by allowing the drive to spread writes across a larger area, reducing the chance of triggering write amplification and thus increasing the drive’s longevity.
10. Replace the old SATA cable & Switch to NVMe
If you have used the same SATA data cable for 3 years or more, replace it with a new one. SATA cables wear out on their own without plugging and unplugging. Replacing the SATA cable with the latest version will optimize SSD’s file access speed.
If possible, switch to an NVMe SSD installed on M.2 slot that boasts nearly seven times the read speed of conventional SATA. Next-generation high-speed transfer, such as sequential 3,400MB/s, is possible. On the other hand, power consumption is about the same as a 3.5-inch HDD, MAX 10W still might need M.2 heatsink.

It doesn’t make the OS boot up extremely fast, but it’s recommended for those who care about benchmark numbers. However, it is also true that the motherboard should be compatible, and it PCIe NVMe is expensive too.
SSD Optimization Myths Debunked
Setting Power Plan to High Performance
With the “Balanced” power plan, Windows reduces power consumption to save on electricity when it is not in use. If you switch to “High Performance,” however, Windows maintains a constant connection and no longer shuts off hardware. Even with this change, though, there won’t be any major impacts on performance since the drive will only go idle when inactive.
Disabling System Restore
If you deactivate the System Restore Service, Windows will not produce system restore points. Some people argue that this feature should be avoided since it takes up disk space and requires additional writes to the drive; these are minor drawbacks compared to its advantages. As explained, these aren’t really issues to worry about. (Also, System Restore is a helpful feature.)
Final Words
As for pure SDD optimization, there is nothing more to do than what I revealed in this guide. There are no more secrets, no moving folders or anything like that, at least in regular use of an SSD to work or play.
Ultimately, I would like to point out that it is best to let Windows do its job. You know how important it is to have a clean temporary cache & .dmp file, but tweaking too much can also be harmful and sometimes decreases performance.
With that said, I hope this guide has been helpful to you! You can also share this guide, ‘How to Optimize SSD for Enhanced Performance in Windows 10‘ on social media.