How to Do a Motherboard Stress Test & Why It Is Necessary?
Stress testing your motherboard is a crucial step in ensuring that your computer system operates reliably under heavy loads. This guide provides a detailed overview of what stress testing entails, why it is necessary, and how to effectively conduct a stress test using various tools.
What is a Motherboard Stress Test & What Is It For?

Stress tests are procedures designed to push computer components to their limits, simulating extreme usage scenarios to evaluate performance and stability.
The primary purposes of stress testing include performance evaluation, system stability, preventive maintenance, and thermal management.
Stress tests help assess how well individual components, such as the CPU and GPU, perform under heavy loads, providing insights into their capabilities. They identify potential stability issues that may arise when components are pushed to their limits, ensuring that the system remains operational during demanding tasks.
Regular stress testing allows users to monitor the health of their systems after repairs, upgrades, or as part of routine maintenance, catching potential failures before they occur. Additionally, stress tests provide insights into how well the cooling solutions are functioning by monitoring temperatures during high loads, which is critical for preventing overheating.
Why Stress Testing is Necessary?
Stress testing is essential for several reasons. First, it helps identify weak points in the system. Stress tests can reveal components that may fail under pressure, allowing for proactive replacements or upgrades. For example, if a motherboard consistently fails during stress tests, it may indicate a need for replacement.
Second, stress testing ensures reliability. For users who rely on their systems for gaming, content creation, or professional work, stress testing guarantees that the system can handle demanding tasks without crashing or causing data loss.
Third, stress testing serves as post-repair verification. After repairs or upgrades, stress testing confirms that all components are functioning correctly and that the system is stable. This is particularly important after replacing the motherboard, CPU, or GPU.
Finally, stress tests provide a baseline for performance metrics, which can be useful for future comparisons after upgrades or changes. This helps users understand how their system’s performance evolves over time.
How to Conduct a Motherboard Stress Test: Essential Steps
AIDA64 is a comprehensive diagnostic tool that provides detailed information about hardware and software configurations, making it ideal for stress testing. Here’s a step-by-step guide to using AIDA64 for motherboard stress testing:
1. Download and Setup:
Visit the official AIDA64 website and download the free 30-day trial. Ensure you select the version compatible with your operating system. The program can be run directly from the downloaded archive without installation, which is convenient for users who prefer not to install additional software.
2. Accessing the Stress Test:
Open AIDA64 and navigate to the “Tools” tab. Select “System Stability Test” from the dropdown menu.
3. Configuring the Test:
Choose the components you wish to stress test, such as CPU, FPU (Floating Point Unit), Cache, and other relevant sections. It’s advisable to run tests one at a time to isolate issues and monitor results effectively. For a comprehensive test, you can select multiple components, but be cautious of the increased load on the system.
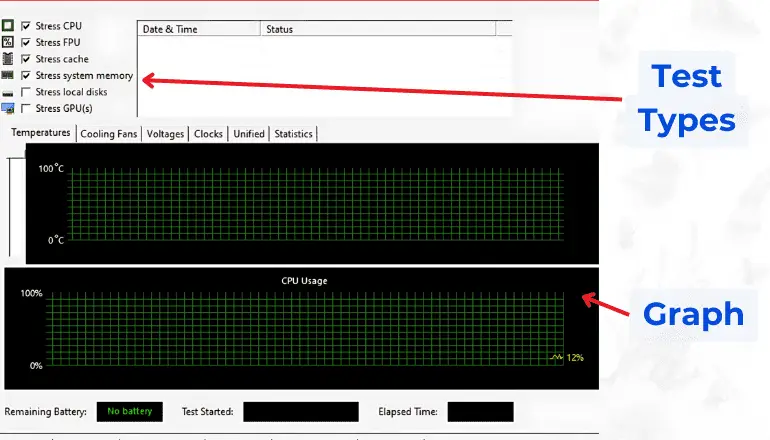
4. Running the Test:
Click the “Start” button to initiate the test. The program will begin applying stress to the selected components. Navigate to the “Statistics” tab to monitor real-time temperatures and performance metrics.
5. Monitoring Key Metrics:
Pay close attention to current temperature and maximum temperature readings. The current temperature reflects the real-time temperature of each component. The maximum temperature indicates the highest temperature recorded during the test.
6. Concluding the Test:
Once the current temperature approaches the maximum, stop the test by clicking the “Stop” button. This step is crucial to prevent thermal throttling or potential hardware damage.
7. Analyzing Results:
After the test, review the statistics for duration, success rate, and temperature logs. Look for any anomalies or failures in performance metrics that may indicate hardware issues. Common indicators of problems include consistently high temperature readings and unexpected shutdowns or error messages during the test.
Other Stress Test Programs
OCCT (OverClock Checking Tool)
It is a popular stress testing tool that evaluates the stability of various components, including the motherboard, CPU, and GPU. It is known for its user-friendly interface and detailed reporting. To run a test, select the “Standard” test option for a comprehensive evaluation of the system’s stability. Specify preferred testing modes based on what you want to stress test, and start the test while monitoring the system’s response. OCCT provides real-time feedback on temperatures, voltages, and performance metrics, along with extensive data logs and graphs for analysis.
Geekbench
Geekbench is another benchmarking tool that tests overall system performance through various tasks. While not as detailed as AIDA64 or OCCT, it provides a quick overview of system capabilities. It tests single-core and multi-core performance, offering insights into how well the CPU performs under different loads. This tool is useful for cross-referencing results obtained from other stress tests, allowing users to validate findings.
For CPU stress testing, Prime95 is widely used for identifying stability issues. It uses complex mathematical calculations to push the CPU to its limits. When using Prime95, select the “Blend” test for a comprehensive evaluation that stresses both CPU and RAM. IntelBurnTest is suitable for both Intel and AMD processors, applying significant stress to the CPU to evaluate performance under load. Users can choose the level of stress (high, very high, or maximum) based on their testing needs.
For GPU stress testing, Cinebench is primarily used for testing CPU performance but can also stress test the GPU with rendering tasks. It provides a score based on rendering performance, which can be useful for comparing systems. Blender is a 3D modeling and rendering software that can be used to stress test GPUs by performing complex rendering tasks. Users can create custom scenes for testing.
Important Considerations for Stress Testing
Before conducting stress tests, ensure the PC is free of dust and debris to promote efficient cooling. Dust buildup can significantly impact thermal performance. Conduct tests in a well-ventilated area to prevent overheating, and consider using additional cooling solutions if necessary, such as fans or liquid cooling systems.
It is essential to understand the limitations of stress testing. The motherboard cannot be tested in isolation; it relies on the performance of the CPU, GPU, and other components. Stress testing one component may affect others, so it’s crucial to consider the entire system’s performance.
Additionally, the methods described apply to motherboards from various manufacturers, including Asus, ASRock, MSI, Gigabyte, etc. However, specific features and capabilities may vary, so consult the manufacturer’s documentation for any additional testing recommendations.
After completing stress tests, carefully analyze the results for any red flags that may indicate hardware issues. Look for patterns in temperature spikes, error messages, or performance drops. If problems are detected, consider upgrading, replacing, or further investigating the affected components to maintain system stability. Regular maintenance, such as checking for driver updates and ensuring proper cooling, can help prolong the lifespan of your components.
By following this comprehensive guide, users can effectively conduct stress tests on their motherboards and understand the importance of these evaluations in maintaining a reliable and high-performing computer system.
Regular stress testing not only helps in identifying potential issues but also ensures that your system is ready to handle demanding tasks, providing peace of mind for users who rely on their computers for work or play.