Stop Overheating! Perfect Amount of Thermal Paste on CPU
If you’re wondering, “How much thermal paste should I use on my CPU?”, you’re in the right place. This guide will not only answer that but also cover everything you need to know about thermal paste.
Understanding Thermal Paste
Thermal paste, also known as thermal compound or thermal grease, is a dense material designed to improve heat transfer between electronic components and heat sinks. Think of it as the “butter” that fills in all those microscopic nooks and gaps between your CPU and cooler. Without it, even the best heat sinks would struggle to keep your CPU cool.
Its primary function is to enhance thermal conductivity by filling in those tiny imperfections on the surfaces of your CPU and heat sink. This ensures that heat is efficiently transferred away from your CPU, preventing overheating and reducing the risk of component failure.
Plus, thermal paste is an inexpensive solution that can significantly improve your device’s performance and longevity.
Stop Guessing: Choosing the Right Amount of Thermal Paste
So, how much thermal paste do you actually need? Not much. For most CPU sizes, around 0.2ml of thermal paste is ideal which converts 0.6 to 0.9 grams. But why exactly this amount?
This figure came from the Kooling Monster, a thermal paste manufacturer, they conducted a test of different quantities i.e 0.1, 0.2, and 0.3ml on a 3cm by 3cm CPU. They found that 0.2ml of thermal paste provided the best performance on a 30mm by 30mm CPU, striking the perfect balance, ensuring optimal thermal conductivity without excess spillage.

But it’s not just about quantity; viscosity matters too. Higher viscosity thermal pastes are better at filling microscopic imperfections. This means more efficient heat transfer and a good CPU temps. However, remember, a little goes a long way. Too much paste can be just as bad as too little.
Popular Thermal Paste Brands
When it comes to thermal paste, not all brands are created equal. Here are some of the top contenders in the thermal paste arena:
- Arctic Silver: Known for their high-quality thermal pastes, Arctic Silver products offer excellent thermal conductivity, making them a popular choice among DIY PC builders and enthusiasts.
- Noctua: This brand offers a diverse range of thermal pastes with varying levels of thermal conductivity and viscosity. Noctua is a go-to for those looking for reliable and efficient thermal solutions.
- Thermal Grizzly: Provides high-performance thermal pastes with excellent thermal conductivity and low viscosity. Perfect for those who want the best possible performance.
Application Steps
Alright, now that we’ve covered the basics, let’s get down to the nitty-gritty: how to apply thermal paste.
Step 1: Prepare the CPU and Remove Previous Thermal Paste
Before you even think about applying new thermal paste, you need to make sure the CPU and heat sink surfaces are squeaky clean. Use isopropyl alcohol and a lint-free cloth to clean off any old paste. This ensures that no dust or debris gets in the way of your new application. Along with this, you can also clean the CPU cooler.
Step 2: Apply the Thermal Paste
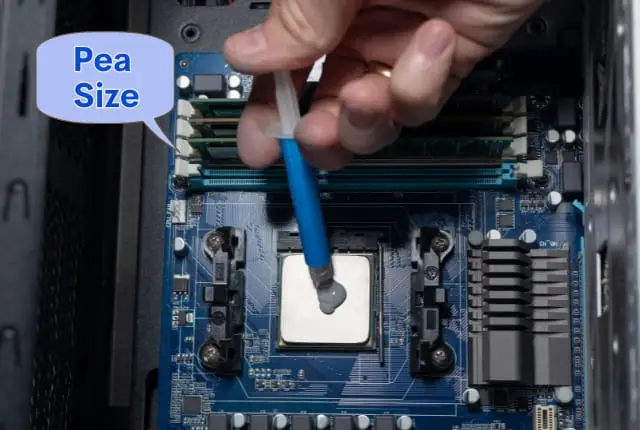
Now, it’s time to apply the paste. Place a small, pea-sized amount (around 0.2ml) in the center of the CPU. While comparing other methods to apply thermal paste like the cross method and the five dots method, the one-dot method generally offers less coverage.
For more even coverage, use a spatula that comes with thermal paste or use a plastic card to spread the paste evenly across the entire surface. Apply gentle pressure to avoid creating air bubbles, which can reduce the effectiveness of the thermal paste.
Step 3: Reattach the Heat Sink
Finally, reattach the heat sink to the CPU, making sure it’s properly aligned and securely tightened. This ensures that the thermal paste is evenly spread and no air gaps are present.
Common Mistakes to Avoid
Applying thermal paste might seem simple, but there are a few common pitfalls you’ll want to avoid.
1. Too Much Thermal Paste
Applying too much thermal paste can actually be counterproductive. The excess paste can increase the physical distance between the heat sink and the CPU, reducing heat transfer efficiency. This can cause your cooling fans to run at higher RPMs to compensate for the reduced heat dissipation.
2. Too Little Thermal Paste
On the flip side, applying too little paste can leave air gaps, which also hinders heat transfer. These air pockets can lead to higher operating temperatures, reducing your system’s performance and lifespan.
Thermal Paste Maintenance
Thermal paste doesn’t last forever. It’s a good idea to replace it every 2-5 years or whenever you notice a dip in performance. Signs of degradation include increased CPU temperatures, louder fan noise, or even overheating.
Upgrading to a higher-quality thermal paste can improve heat transfer, reduce noise, and boost overall performance. Since you know how much thermal paste on CPU, just make sure the new paste is compatible with your CPU and cooler, and consider the cost and availability before making a switch.
FAQs
How Much Thermal Paste Do I Need?
Typically, 0.2ml or 0.6 to 0.9g of thermal paste is sufficient for most CPU sizes.
What Happens if I Apply Too Much or Too Little?
Applying too much or too little thermal paste can lead to inefficient heat transfer and reduced performance. In other words, your CPU won’t be as cool as it could be, and you might notice a dip in performance.
Will Applying More Thermal Paste Improve Cooling Performance?
No, more paste does not equal better cooling. In fact, too much thermal paste can insulate the CPU, reducing cooling efficiency. Stick to the recommended amount.
Can I Reuse Thermal Paste?
Thermal paste isn’t designed to be reused. It’s best to apply a fresh layer each time you replace your cooler or if you notice any performance issues.
What if I Get Thermal Paste on My Motherboard or Other Components?
Accidents happen. If you get thermal paste on other components, clean it off immediately with isopropyl alcohol and a lint-free cloth. Better safe than sorry!