How to Clean PC Fans? (Case Fan, CPU Cooler, GPU & PSU Fan)
Like your living space, your computer also needs a good cleaning from time to time, especially its cooling system – the fans that maintain performance by keeping the internal components cool.
Over time, dust and dirt – a great enemy of electronics naturally accumulate on fans, blocking the cooling system and causing your PC to run hotter than it should. If not addressed, we all know that it will be responsible for many problems, such as sudden loud noise of fan, reduced performance, and its aesthetic impact must not be forgotten either.
In this guide, I’ll walk you through the process of cleaning your PC fans effectively, either case fans, CPU cooler, PSU, or the GPU’s fan, securing it runs smoothly and quietly again.
How to Clean PC Fans?
Tools Required for Cleaning
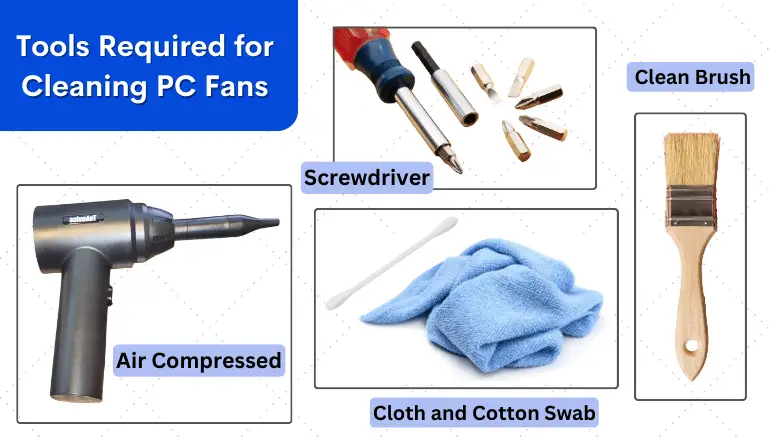
Cleaning your PC fans doesn’t require much toolkits or specialist equipment. Most of the necessary tools are likely already in your home or can be purchased at a modest price. Here’s a list of the essentials:
Small Brush
The fundamental tool to clean your fan is the brush. It is a tool widely used in cleaning PCs, allowing us to efficiently remove dust from surfaces. Think of it as a soft-bristled brush that works really well.
Regarding its size, it shouldn’t be too big to be able to cover all possible corners, but not too small so that you do not have to work too hard with cleaning. Apparently, the brush must be clean, don’t even think about using it with traces of paint or similar.
Compressed Air
In the case of a PC fan, a compressed air canister is an excellent option for cleaning hard-to-reach places like aluminum radiators (pipes or liquids), removing dust from the plate, etc. But for a fan propeller, it seems unnecessary.
Using a brush is sufficient but not compressed air (unless you have a compressor at home). Obviously, you can try it if you see that the results are not satisfactory. Sometimes it can come in handy, but if you do, remember to hold the blades with your hand so they do not rotate with the air disrupting their alignment.
Microfiber Cloth & Cotton Swabs
Microfiber cloths are for wiping down dust after brushing without scratching or leaving behind lint, while Cotton swabs are stubborn dirt to dust off and dust in the corner of your fan or delicate areas.
Screwdriver
A screwdriver is necessary to disassemble parts. Case fans and CPU coolers often have screws securing them in place. When disassembling them, don’t forget to keep track of all the screws and where they came from. A simple way to do this is by placing them in a small container or mapping them out on a piece of paper.
Guide and Steps to Clean Fan
1. Case Fans
To access the fan inside your PC, remove the side panel with either your hands or a screwdriver (usually 2-4 screws). Turn off your PC, unplug it from the power from the wall outlet, open your case, and select the fans that need cleaning.
If the fan is on the front of the case, remove that as well. The fronts of modern cabinets are usually removable by pulling them from the bottom where the air inlet is located. This may require some force, but be careful not to break any plastic pins that hold the front in place or unscrew any screws. The same process applies to the top, side, and back fans.
Don’t forget to thoroughly clean any dust filters, if any. At the top, back, or other.
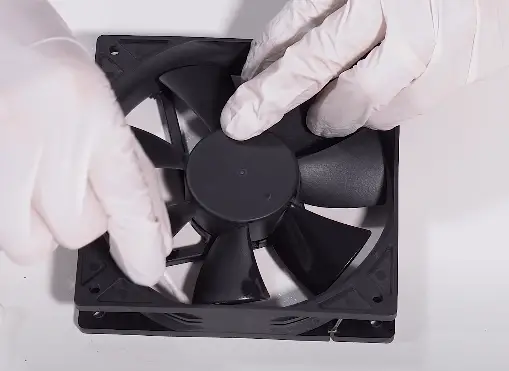
In these cases either DC or PWM Fan, removing the fan is practically mandatory. You should have free access to both sides of the fan to clean it well. Don’t worry. Follow the cable to locate the connector it’s connected to, disconnect it (while remembering its position to reassemble it properly), and unscrew the fan once the cable is completely free.
- Now to clean, hold the fan blades still with one hand.
- With the other, brush decisively as follows:
- Clean the part where we see the blades and their rotation.
- Now, clean the space between each blade until you leave no trace of dust between them.
- Finally, clean the fan frame and give it a general overhaul. The result should be very good
- If there is very encrusted dust, a sensible option is to try microfiber cloth & cotton swabs, and if you see that it doesn’t even come out, you can moisten them a little, taking care that no water goes inside the fan such as lightly dampened microfiber cloth to wipe.
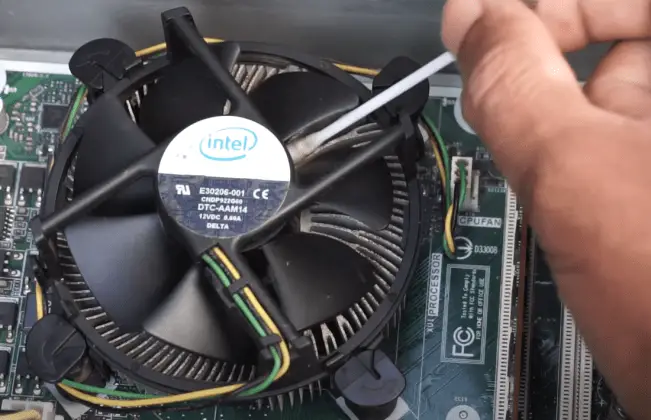
2. Stock CPU Cooler (Intel or AMD)
The CPU cooler has a fan and a heat sink attached, which sits on top of the CPU chip to maintain temp. You have to do is completely disassemble the CPU cooler.
In the case of Intel, you will have to rotate the 4 attached latches at the corners with which it is attached to the motherboard, and the heatsink should come out without problems.
If it is an AMD CPU cooler, especially the most recent ones, you will have to unscrew its 4 screws. Remember the rule for unscrewing that I indicated before, and in fact, you should do it little by little (in several passes until they are completely unscrewed).
For cleaning the CPU cooler, compressed air helps more, so after detaching the CPU cooler unplug the fan’s power connector from the PCB motherboard.
- Hold the fan blades stationary and use short bursts of compressed air to remove the dust.
- Use a cotton swab for any hard-to-remove dust.
- Clean the heat sink using compressed air.
- Once everything’s clean, reapply the thermal paste on a heatsink, carefully reinstall, and reconnect 3 pins or 4 pin wire of the CPU cooler.
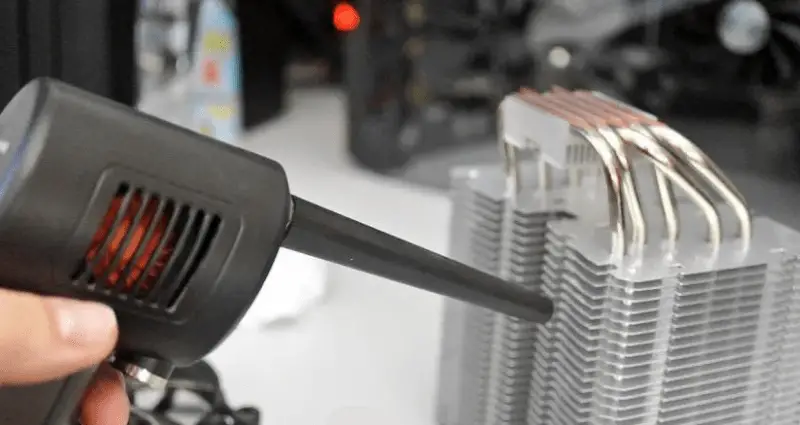
3. Tower Heatsink Fan or Liquid cooling Fan
Here, disassembling the fan is a bit different. With a liquid one, you will have to locate where the screws are and how they fit. Perhaps their access will be more complicated, although it is not normal. For a tower heatsink, the fan is usually secured with metal clips that attach to the fins. To remove the fan, find the clips and carefully press them to release them from the fins.
If you have a complicated CPU cooler, like a fan between two aluminum towers, it’s best to refer to the user manual for your assembly, and doing the reverse process is the best idea.
Here, the cleaning process remains largely the same. For a thorough clean, wipe the fan blades with a lightly dampened cotton swab, and using compressed air to away dust caught in the cooling fins or towers is more effective. And it will be worthless if you do not clean those areas.
4. Power Supply Fan
The PSU is typically located at the back, the bottom of your PC case.
You will unlikely be able to get a a fan without opening the PSU. And that is not only a process that can pose risks of failing the PSU but also voids the warranty. But using compressed air would be the most effective method here:
- First, unscrew and take out PSU from the case.
- Use compressed air to blow the dust through the venting holes. Remember to keep the can upright and use short bursts.
- Make sure to prevent the fan from moving by blocking it with a pencil or similar thin object, and be very careful that no water comes out from it if you use it.

- Once you’ve cleaned as much as possible, reinstall the PSU into your PC case.
5. GPU Fan
If your computer has a powerful graphics card, it uses at least one fan. Budget models do not have them. To clean such a cooler, you need to dismantle the graphics card. To do this, remove its power supply connector cable from the PSU, unscrew the screw that secures the mount to the chassis, and carefully remove the part from the PCI-E port.
On almost all video cards, the printed circuit board at the bottom is covered with a plastic decorative panel, from which a fan or 2-3 sticks out. To clean them, you need to dismantle these panels of fans. To do this, unscrew some screws that secure it to the graphics adapter case.
Once removed, use a brush to clean the fan and heatsink. If there is stubborn dust, use microfiber cloth & cotton swabs.
After cleaning, carefully screw the fans on a heatsink and reinstall the GPU into its slot, and secure it.
Post-Cleaning Instructions
After completing the cleaning process, let’s go through the steps to get your PC up and running smoothly again:
- Ensure that you have reattached the fans and other components in their original positions.
- Reconnect any cables of fans that were unplugged, and don’t forget to securely replace all the screws
- Once everything is reassembled and connected, plug your PC back into the power source and switch it on.
- Keep a keen eye (and ear) on your fans to make sure they’re spinning properly without any strange noises.
- Keep a close watch on your PC’s temperatures in the coming days. You can utilize software like HWMonitor for this purpose.
- If you notice any abnormal temperatures, it need to turn off the fans and heatsink to recheck the installations.
Final Words on cleaning a PC fan
Cleaning a PC fan is an essential process that needs to perform periodically, and it is an approach that we must carry out with all the fans in the PC case. It is not only about extending the useful life of them and the entire PC but about keeping it presentable.
The PC case will also require general cleaning, and surely, if you have a tempered glass panel, cleaning it will have to be more frequent if we want to maintain the aesthetics of our assembly. And, of course, it’s also a good time to clean up the rest of your PC!