How to check RAM frequency on Windows? (RAM Speed)
What is the frequency speed of my RAM in my Windows PC? There is an easy answer to this question; you just only have to follow some simple steps.
Ways to check RAM frequency
To check the RAM frequency (also known as RAM speed) on your computer, you can use various methods:
1. Task Manager:
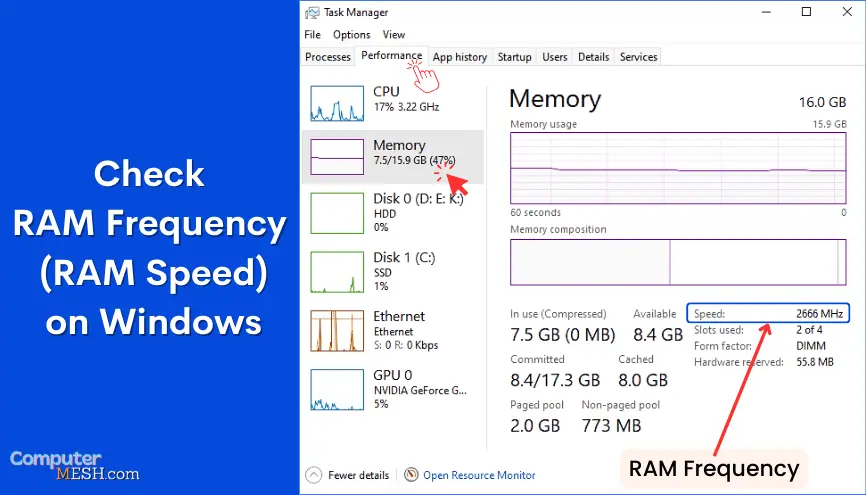
- Right-click on the taskbar and select “Task Manager” or press Ctrl + Shift + Esc on the keyboard.
- In the Task Manager, go to the “Performance” tab.
- Click on “Memory” in the left sidebar.
- On the bottom side, you will find the information about your RAM capacity (used and available), number of RAM slots used, including its frequency speed.

2. Using Command Prompt:
You can use the Command Prompt program in Windows to check your RAM speed. Here’s how:

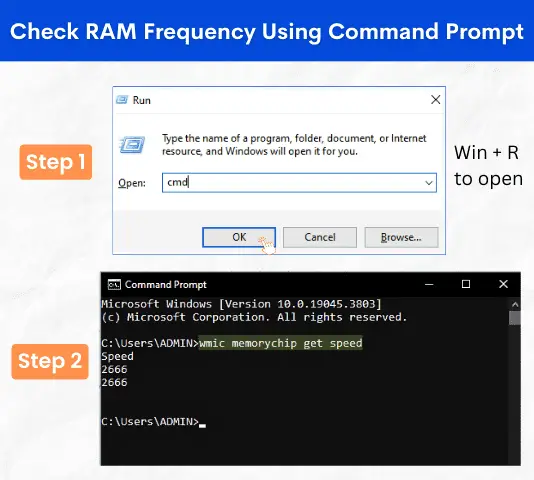
Press the keyboard shortcut Win + R to open the Run dialog. Type ‘cmd’ and click ‘OK’ to open the Command Prompt.
In the Command Prompt, type the following command:
wmic memorychip get speed
Press Enter, and it will show the speed (frequency) of your RAM.
3. Using Third-Party Software:
There are also third-party applications that you can use to get detailed system information about your system, including RAM specs. CPU-Z is one such tool. You can download it free and install it from the official website: CPU-Z.
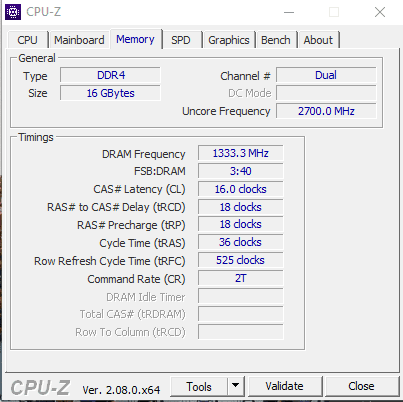
Once installed, open CPU-Z Application and go to the “Memory” section from the menu. There, you will find information about your RAM, including its frequency, RAM type, and more.

From the above image, the frequency indicated by CPU-Z is the real one, i.e., half of the frequency manufacturers advertise. So, those “1333MHz” would be “2666” if you consider DDR (Double Data Rate).
4. Through BIOS/UEFI Settings:
Another way to check your RAM frequency is by accessing your computer’s BIOS or UEFI settings. Here’s how:
- Restart your computer and enter the BIOS or UEFI settings by pressing a specific key (usually F2, F10, or Del) while the computer is booting up.
- Navigate to the menu or the section that displays hardware information or system configuration.
- Look for an entry related to ‘Memory’ ‘OC’ ‘XMP’ or ‘RAM’. The RAM frequency should be listed there in megahertz (MHz) and as “DRAM Frequency,” “Memory Clock,” or something similar.

The displayed RAM frequency does not match the frequency specified on the RAM stick.
If you observe a difference between the RAM frequency displayed in Windows and the one specified on the RAM stick, there could be a few reasons:
1. XMP (Extreme Memory Profile) / Overclocking
You might notice that the frequency mentioned on your RAM stick is higher than what is shown in Windows. The fact is that the label on the RAM stick indicates the maximum speed that it can run at ONLY when using XMP profiles or overclocking.
Meanwhile, the one displayed in Windows is the base frequency, which is usually lower and the default setting for most RAM sticks.
To make use of the max frequency as specified on your RAM stick, you can enable XMP profiles in BIOS. For AMD chips, you have to enable DOCP (Direct Overclocking Profile) rather XMP. However, both technologies achieve the same goal.
2. Motherboard Limitations
Motherboards have limitations on the speed at which they can support RAM. This might result in a difference between the frequency displayed in Windows and the one specified on the RAM stick.
To ensure that you are getting the maximum performance from your RAM, make sure to check your motherboard specs for its supported RAM frequencies and adjust accordingly.
For example, the Asus PRIME Z690-A Motherboard supports a max of 6000 Mhz of DDR5 RAM frequency. If you install any RAM with more than 6000 Mhz, such as 6200, 6400, 7200, or even more, you will see that the RAM frequency is running only at 6000 Mhz by the system, even if tweaked in BIOS.
To avoid this, it’s important to match the compatibility of your RAM and motherboard device in terms of speed.
3. Mis-Match in Channel Configuration
Another reason could be due to a mixing of two or more different RAM sticks.
For example, suppose you have two RAM sticks with different frequencies and running both in dual-channel (two slots) configuration. In such cases, the system will automatically defaults the frequency of the slowest RAM stick.
Hence when upgrading RAM, it is recommended to use RAM sticks with similar frequencies in a channel configuration for maximum performance. This can be checked by referring to your motherboard’s manual or third-party software.
FAQs
What frequency do I set my RAM to?
The frequency of your RAM should be set as per the specifications provided by both your motherboard and RAM manufacturer. You can either set it at max speed for max performance or keep it at default settings, depending on your requirements.
What is the best MHz for RAM?
The higher the MHz, the faster the RAM will perform and thus allow you to work more applications and processes at one time. However, running at best higher RAM frequencies is viable only if your system components, CPU and mobo, can support it.
How do you check RAM speed (frequency) physically?
To physically check the frequency of your RAM, you can either refer to the sticker on the RAM stick or look at its manual. If you can’t find the information there, you can search the model on the Internet to get the information from the official site.
Why is my RAM not running at its advertised speed?
A higher possibility why your RAM is not running at its advertised speed is that the BIOS settings are not configured correctly or XMP (Extreme Memory Profile) isn’t enabled, which allows your RAM to run at its specified frequency. Another reason could be due to a bottleneck in the motherboard, review its specs if whether it is supported with the RAM’s Mhz.
How do you check RAM frequency using cmd?
To check at which frequency RAM is running in the command (cmd), use the prompt “wmic MemoryChip get Speed” and press enter. This will give you the frequency of your installed RAM.
