Connecting USB 3.2 gen 1 to USB 3.2 gen 2 Header on Motherboard & Different Versions, its Impacts
You already know that, with time, technologies evolve. The same is the case for USB standards in computers.
The latest USB versions are 4.0 and above; however, many still run on previous versions, such as 3.2, 3.1, 3.0, and even 2.0. Now, you must be wondering if it still makes sense to be running such (2.0 / 3.0) older standards. Turns out it does!
Ahead, I will start by explaining why and then delve deeper into the tips for connecting your PC case’s USB port to the right USB header on the motherboard, even if there is a compatibility gap. This is important as you will want the USB connections to be compatible if you want the best speeds.
USB Headers: What Are They And How You Can Identify Them?
You would have seen the USB ports on the back end of your motherboard; they are already soldered into the motherboard. So, how the front USB ports (on the chassis of your PC case) are connected to the motherboard? The answer is through USB headers.
That’s where USB headers come in; these are small connection points typically located on the bottom or right side of the motherboards near CMOS. This is where you connect the wires that come from your PC case (of front USB ports❳ in order to establish a power connection and use them.
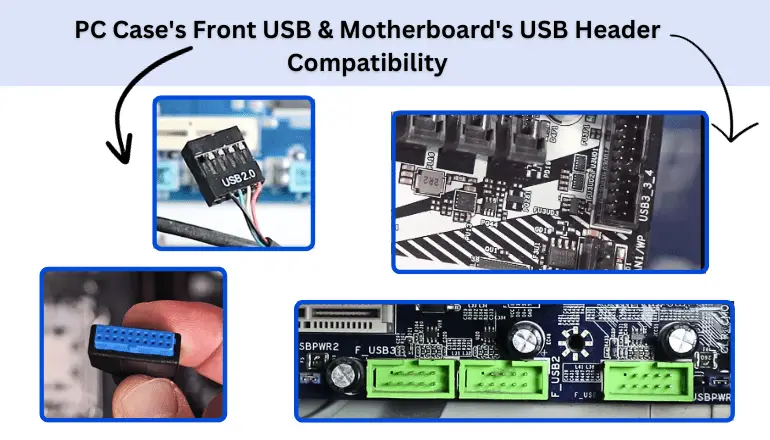
You can identify the USB headers by looking at their labels or shortcodes on them. They will typically be named something like “F_USB”, “FPANEL_USB”, or “JUSB1. The F stands for the front, while J stands for Jack or Jumper (there are mixed reports). MSI motherboards are more likely to use J_USB as a naming convention.
USB Versions – Generations And Their Speeds
Over the years, USB versions have undergone several revisions; now, I won’t confuse you with the confusing naming schemes – such as how USB 3.0 is also known as USB 3.1 Gen 1 – but here’s a quick summary of different USB versions, their speeds, and best use cases.
USB Versions | Maximum Data Speeds | Recommended Use Case |
USB 1.0/1.1 | 1.5 Mbps | Basic Peripherals, Mouse & Keyboard |
USB 2.0 | 480 Mbps | Peripherals, Gaming Mouse, Gaming Keyboard, Printers, Scanners |
USB 3.0 | 5 Gbps | |
USB 3.1 Gen 1 | 5 Gbps | External HDDs, High-Resolution Webcams |
USB 3.1 Gen 2 | 10 Gbps | External Ssds, High-Resolution External Displays |
USB 3.2 Gen 2x2 | 20 Gbps | Professional-Grade External Storage |
USB 4.0 | 20 Gbps (Minimum) | Docking Stations, Super-Fast Data Transfer |
Since there are so many versions of USB 3, you must be wondering why so and why isn’t a simpler naming pattern.
For example, USB 3.1 Gen 2 offers double the speed of USB 3.0 – shouldn’t it have then be named USB 4.0?
Well, it would have been easier, but there are a few justifications for that not happening. One reason is that the manufacturers didn’t want to confuse the consumers with different names, especially when they are backwards compatible – adopting one USB type would risk a total abandonment of the other USB type.
Other reasons have to do with marketing considerations and licensing fees. Here’s the table below towards naming scheme of USB:
USB Standard | Previous Name | New Name Scheme | Maximum Speed |
USB 3.2 Gen 1 | USB 3.0 USB 3.1 Gen 1 | USB 3.2 Gen 1 | 5 Gbps |
USB 3.2 Gen 2 | USB 3.1 USB 3.1 Gen 2 | USB 3.2 Gen 2 | 10 Gbps |
USB 3.2 Gen 2x2 | (Nonexistent) | USB 3.2 Gen 2x2 | 20 Gbps |
USB 4 | USB 4 | USB 4 | 40 Gbps |
USB Compatibility – Between Motherboard and PC Case Front Panel?
Most USB headers are designed to be backwards compatible – which means that you can connect a USB 3.1, 3.2 or even Gen 2 connector (wire) to a USB 3.0 header (motherboard connection). However, you will only get the maximum speed of the lowest common denominator.
There are also considerations for pin configuration. For instance, the USB 3.2 Gen 2×2 requires extra pins to operate at its maximum speeds of up to 20 Gbps. Using a lower-level header will only supply its maximum speeds, and you won’t be able to tap into the maximum potential of the higher Gen 2×2 speeds.
If we take an example like MSI X470 GAMING ATX Motherboard used along with Cooler Master Hyper 212 PC case.
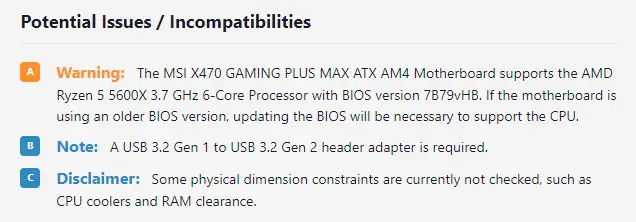
As per PCPartPicker.com, there will arise a compatibility gap between a USB 3.2 Gen 1 (a PC case has) and a USB 3.2 Gen 2 (a motherboard has). Still, as I said, you can connect them, but only the speed would go with the lower version of USB, whichever is between them.
So what should you do in such a case? Change or upgrade either of the components (motherboard or PC case). If not possible, consider using adapters or converters that I have talked ahead in this post. Before that, an important thing needs to be aware of.
IMPORTANT – Do Not Damage Your USB Header
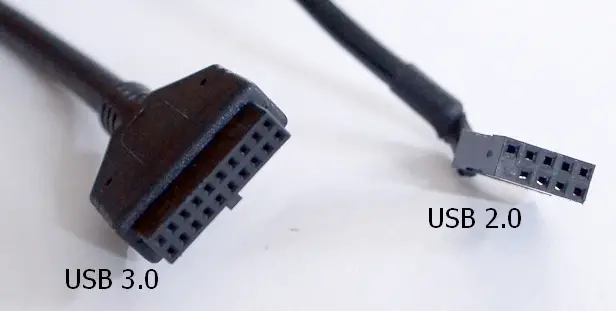
The above image shows USB headers for USB 3.0 and USB 2.0. The USB 3.0 has more pin holes to support higher speeds.
The important thing is that while you might be able to connect the 3.0 connector (wire) to a 2.0 header on your motherboard, it doesn’t go the other way around if there are more pins!
The USB 3.0 header on the motherboard will have more pins that WILL BE DAMAGED by a USB 2.0 (pinholes) connector as it may not fit properly into the socket.
Therefore, it is essential to match the number of pins on the header to the number of slits on the connector to avoid any damage and also make an optimal connection.
Tips For Ensuring USB Compatibility
Although USB versions are backwards compatible, mismatched power supply connections will give you reduced speeds. And in the worst case, you risk damaging the headers on the motherboard. Therefore, here are some tips to ensure that you are using the suitable connectors with the proper headers:
1. Read The Motherboard Manual to understand USB header locations and pin configurations.
2. Label Verification – USB headers are often labelled as “USB2”, “USB3.0”, “USB3.1”, etc., indicating their standard and generation.
3. Connector Shape – USB 2.0 connectors would have different shapes and fewer pin slots to differentiate them from USB 3.0 connectors.
4. Pin Inspection – Inspect the pins to identify if they match the slits on the connectors. Additionally, a similar number of pins might not have the same layout.
Remember that motherboard connections are usually made quite gracefully – with a gentle insertion. If you’re experiencing unnecessary resistance, you might not be making the correct connections. You might want to use an adapter for your USB connection in that case.
USB Adapters – For Incompatible Or Additional Connections
There are a variety of adapters that can be used to connect to a USB header on the motherboard. Front panel USB ports are typically 3.0 and above. Therefore, you should connect them to appropriate high-speed USB headers.
Here are different adapters that you can use and their purposes:
1. USB 3.0 To USB 2.0 Adapter
This will allow you to downgrade your 3.0 header on the motherboard to connect with a 2.0 USB connector so you can connect your USB 2.0 wire from the front side PC case. You will need this adapter when you’re using an older PC case with a newer motherboard. Examples are:
- LINKUP – USB 2.0 Female to USB 3.0 Male 20 Pin IDC Motherboard Header
- Duttek USB 3.0 Header to USB 2.0
2. USB 2.0 To USB 3.0 Adapter
Now, opposite to the previous scenario. This adapter allows you to upgrade your USB header on the motherboard to a 3.0 connector and connect. This adapter will particularly be helpful when you have an older motherboard with the latest PC case, or you have run out of 3.0 USB headers on your motherboard. Examples include:
- LINKUP – USB 2.0 Female to USB 3.0 Male 20 Pin IDC Motherboard Header
- Duttek – USB 2.0 Female to USB 3.0 Male Motherboard Header Adapter to Front Panel USB Header Adapter Cable
3. USB Hubs
The above were the adapters, but if you don’t need adapters and just want extra USB ports for external peripherals or transfer from USB to USB cable – in such needs, you can get with a USB Hub. However, these are plugged into a free USB port instead of a USB header or Front panel USB (wire) connector. Some examples are:
- Anker PowerExpand 4-Port USB-C Hub
- Sabrent 4-Port USB 3.0 Hub
- Amazon Basics 4-Port USB 3.0 Hub
4. PCIe USB Expansion Cards
Instead of using a USB Hub, desktop users can also use a PCIe USB Expansion Card. Although you will need to open up your PC case to install it on any of PCIe slots, but it is worth it – you will get faster speeds instead of settling for slower USB 2.0 speeds. Some famous examples include:
- PCI-E to USB 3.0 by Yeeliya
- FebSmart 4 Ports Superspeed 5Gbps USB 3.0 PCI Express Expansion Card
Conclusion
In the ever-evolving world of technology, USB versions have undergone several revisions. The earliest 1.0 Gen has been completely phased out, while USB 2.0 is still quite dominant today for basic peripherals. You can use these for RGB purposes as well as to connect your mice and keyboards.
However, the USB case’s front panel USB ports should be reserved for faster USB 3.0 connections. You can accomplish this by connecting them to a suitable header on the motherboard. You can identify these by looking at their labels – which primarily look like “FUSB” or “JUSB”.
There are adapters also available to make USB connections to avoid any damage to the motherboard/PCB. However, you might also experience reduced speeds.
Finally, if you need more USB ports, USB expansion cards are a great option that does not cause a reduction in speeds, depending on the capability of the PCIe port and the expansion card itself.