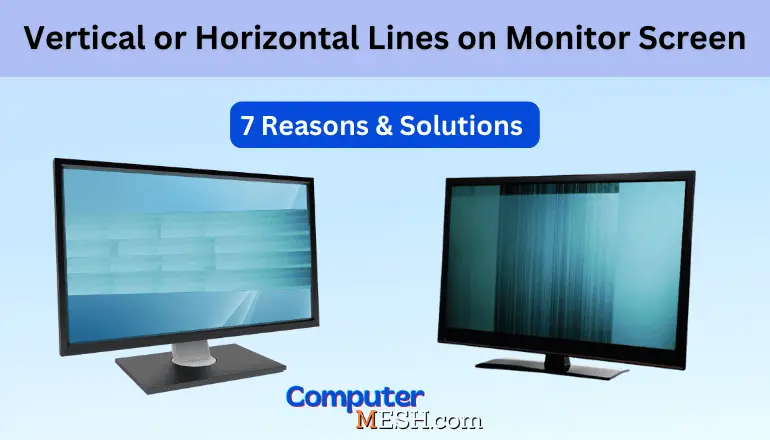
7 Reasons why Vertical or Horizontal Lines on Monitor Screen
Are you troubled by yellow, red, white, or green vertical or horizontal lines on your monitor screen? These are visual defects and can be a real nuisance. Not only is it annoying, but the issue is reducing the quality of your viewing experience. Unfortunately, most often, it requires repair, but not always.
Fortunately, there are ways to fix these issues and get back to enjoying your screen in full clarity with some preventative tips to ensure that these problems don’t occur in the future.
In this article, I will look at the source of the problem (well, knowing the essence of the problem – often it can be eliminated on its own) & possible reasons why lines may appear, and how you can quickly resolve it with troubleshooting techniques.
By reading this article, you will understand what to do when the line on the computer screen is displayed and what to do if it does not fix even after dealing with it. Let’s read on!
7 Possible Causes when a Horizontal or Vertical line appears on Monitor
If the computer screen contains horizontal or vertical lines, there could be different causes related to the screen, equipment, or software. Let’s look at the cause one by one.
1. Decrease in processing power
Computers are always processing or doing something by which various data will be accumulated inside the computer after leaving PC for long time.
Depending on the performance of your computer, if you do multiple tasks or heavy work, over time, this process can lead to loads on the parts, and the performance will deteriorate. The processing may not keep up, and lines may appear on the screen.
Such as lines appearing on the screen or part of the screen not being fully processed when switching between apps; if this is your case, the processing capacity is likely degraded.
2. Driver bug
Different peripherals like a mouse parts, keyboard, monitor, and graphics cards are connected to a computer but rely on drivers to function properly.
The monitor itself is composed of two drivers: a graphics driver for the graphics card and a display driver for the monitor. If any of these drivers are outdated or corrupted, it won’t display correctly or show horizontal lines on monitor screen.
3. Computer Static Electricity
If unnecessary electricity builds up in the computer, the burden will increase, causing other devices to malfunction. Normally, the computer has a function to prevent static electricity, but sometimes the same function can interfere with power flow from being properly supplied to the monitor, and lines may appear.
Static electricity is more likely to happen when a PC is used continuously for a long time, have many peripheral devices connected, or when the power cable is always plugged into the outlet.
4. Faulty display cable
If there is a problem with the display cable that connects the PC case and the monitor, like a loose connection or broken one, a line would appear on the computer screen. In some cases, excessive force is applied to the cable, causing internal disconnection or a problem with the connector.
There are also simple mistakes, such as not firmly inserting the adapter all the way to the base. In addition, similar symptoms will occur if the HDMI or Displayport cable terminal is damaged due to frequent use.
This is more often with older connector like VGA and DVI types.
5. Monitor failure
Lines may also appear on the monitor when a strong physical impact is applied to the monitor, such as hitting an object or dropping it. Also, if your monitor or laptop display is over four years old, the liquid crystal panel may fail due to aging.
6. Motherboard or graphics card failure
A computer or laptop consists of various parts, but among them, the motherboard and graphic board are responsible for displaying images on the screen. If you experience lines appearing on the screen, this could mainly indicate a problem with these parts.
Even if you open the PC case, it is difficult to determine which part is broken, so if the software and monitor are working fine, consider the possibility of internal component failure. In particular, if you connect the computer to a different display using a new cable and the same problem occurs, the issue is likely inside the chassis between a motherboard or graphics card.
Since it is difficult to diagnose the computer’s internal state by yourself, something can still be done, which I explained later in this article.
Actions that Shouldn’t be done When Vertical or Horizontal Lines on the Monitor
If lines appear on your computer screen, do not do any of the following:
Leaving the lines on your computer screen as they are will not help and could worsen the problem over time. Gradually, one line, two lines, and so on, the number of lines will increase, and before you know it, your computer screen may be full of lines.
Likewise, if an abnormality inside the computer causes these lines, continuing to use it without fixing the issue can cause the circuit board or parts to short out and the computer itself to stop working. If the symptoms worsen, your computer will break, or you will not see the screen, so take action as soon as possible.
7 Ways to Deal with Vertical or Horizontal Lines on your Monitor Screen
So far, I have discussed why lines appear on the computer screen. Both software and hardware problems can be the cause of abnormalities in the display. Next, I explained various methods to troubleshoot display problems, which you should follow step by step.
It’s difficult to tell which one is the problem at first glance, and it can’t be resolved with a single solution. You’ll have to try the solutions one by one to fix it.
1. Shutting Down the Computer.
If you have been using your computer for a long time, you can recover the process by shutting it down. At this time, let’s also cancel the static charge. Please refer to the table below for how to discharge.
Here’s how to discharge your computer.
- Unplug the power cable from the outlet
- Remove the display, Ethernet, and USB cable
- Remove peripherals such as keyboard, external hard disk, printer, and all
- Press the power button several times with the power cable unplugged (desktop only)
- Remove the battery (laptop only)
- Leave for 90 seconds or longer
When unplugging the cable, unplug both the display-side plug and the graphic board-side plug. Since it is not possible to visually tell which side has poor contact, removing and inserting only one side may not fix the connection issues.
After doing the above, reconnect the cables and turn on the power to check the vertical or horizontal lines on Monitor Screen. It is better to swap and reconnect with a different display cable if you have one because there are cases where the display cable is cause.
2. Match the Resolution of the GPU to the Monitor output
If the Display is connected to a computer, then it’s possible that the GPU resolution isn’t matching the monitor output. This can force horizontal or vertical lines as the image appears stretched when it tries to fit into the wrong resolution. Therefore, ensure that the resolution on the GPU side is suitable for the recommended value of monitor screen size.
To fix this, you need to modify the settings with what is available from your gaming or regular monitor. Here are the specific steps:
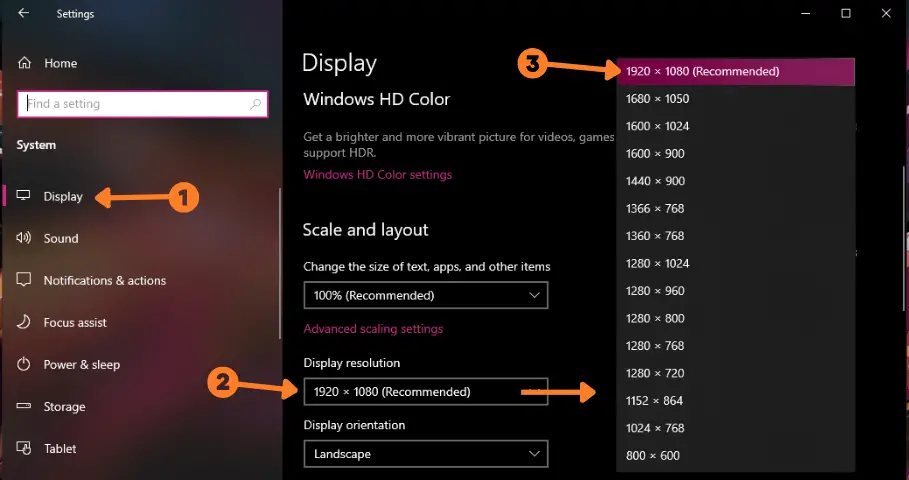
- Right-click on an empty area of your desktop and select the “Display Settings” option.
- Click Display from the left side.
- Find “Display Resolution” in the right pane and open the pull-down.
- Select (Recommended) resolution, the proper resolution for the monitor to display.
- When asked “if you want to keep the display settings,” click “Keep Changes.”
- Close the window, and you are done.
- Now you can set the appropriate resolution for your Display.
If the recommended isn’t on the list and you don’t know the right resolution for your Display to choose, check your Display’s manual. For example, Acer SB220Q bi monitor has a 1920 x 1080 screen resolution.
If you have a graphics card from NVIDIA or AMD, you can modify the resolution using the manufacturer-provided setting tool (NVIDIA control panel or AMD Catalyst Control Center.). Sometimes, it may be worth attempting to adjust the resolution using these tools.
3. Open BIOS for Vertical or Horizontal Lines to Inspect
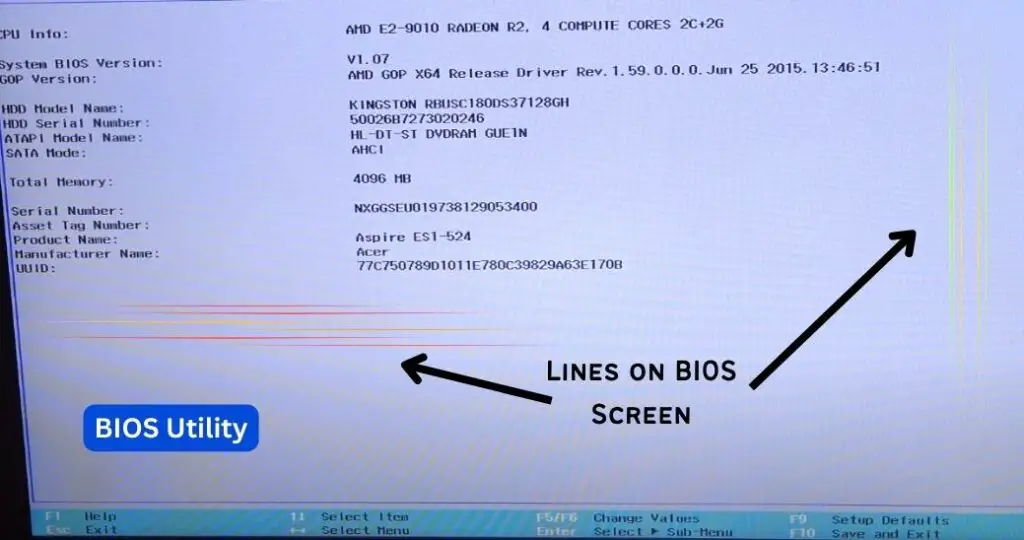
It is a good way to enter the BIOS to review whether the cause of the lines on the screen is the software/Applications or whether it is the internal PC parts or the monitor.
BIOS legacy or UEFI BIOS is a program built into the motherboard that allows you to set the overall control of the computer, and it runs before the OS, and applications start up. Since BIOS is not part of the software, you can determine which one is the cause by noticing any strange lines displayed on the BIOS screen.
Display on the BIOS screen | Likely cause |
Lines Appear | GPU, Monitor or Motherboard |
No Lines Appear | Software / Aplication or OS |
To enter the BIOS screen:
- Shut down your computer once
- Turn on the power again
- Start pressing the BIOS key during boot (when the computer manufacturer’s logo appears).
It’s important to keep in mind that the key to access BIOS differs by the motherboard manufacturer. While many use F2 or DEL key, others may use the F12 key to enter in BIOS, so be sure to check your manufacturer’s BIOS startup key before attempting to access it.
Once opening BIOS, if any line is displayed on the BIOS screen, it is suspected that the GPU or the monitor is malfunctioning.
But if you don’t see any vertical or horizontal lines on the monitor screen during clean boot. So, the issue is more likely with drivers or software/program.
4. Update your computer’s drivers to the latest version
Updating the computer driver to the latest version may eliminate the screen issues like mouse frozen, stuck pixels, as well as strange lines.
First, let’s update the display/monitor driver, which is the driver that drives the display.
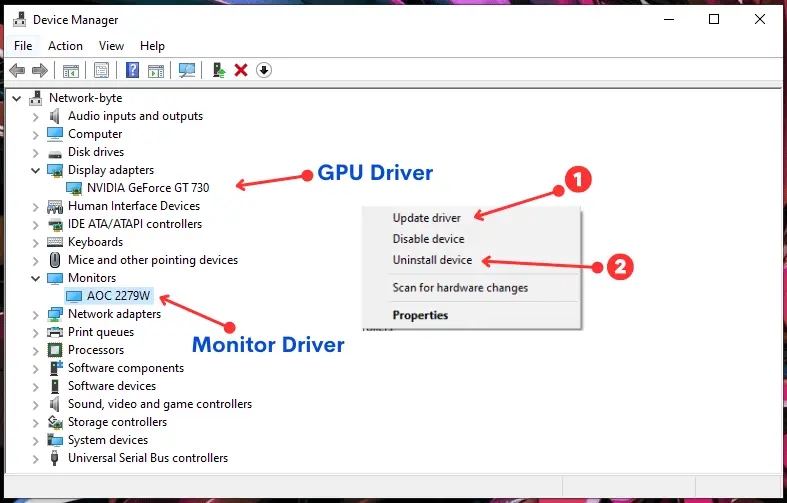
- Search for “Device Manager” in the search bar to open it.
- Click “Display adapters”
- Right click on the graphics driver you are using
- Select “Update Driver”
- Click “Search automatically for updated driver software” Wait until it completes and update as instructed.
- Restart
Once you have completed this step and the latest version of the driver is installed, the message “The best driver for this device is already installed” will be displayed.
If lines appear on the screen even with the latest version, reinstalling the graphics driver is another way to do it.
Follow the same procedure as before until you reach the graphic driver item, and then execute as follows.
- Right click on the graphics driver name
- Click “Uninstall device”
- Follow the instructions to uninstall the driver
- Restart your computer
- Wait for graphics driver reinstallation
- After completing the reinstallation, check if the line is displayed in the same position.
If the situation isn’t improved, follow the same process with monitor drivers by clicking on monitors. 1. Updating the monitor driver and then 2. Reinstalling the monitor driver.
To prevent such problems in the future, it’s recommended to enable automatic driver updates in Windows 10 or 11.
5. Find Apps that Causing Lines using a Clean Boot
A clean boot is a way to start your computer with only Windows programs. If the line is not displayed during this (clean boot state), a non-Windows app running in the background is responsible for the lines appearing.
So boot your PC into a clean boot and see if the display issue will resolve. The steps are a little lengthy, but let’s go through them one by one.
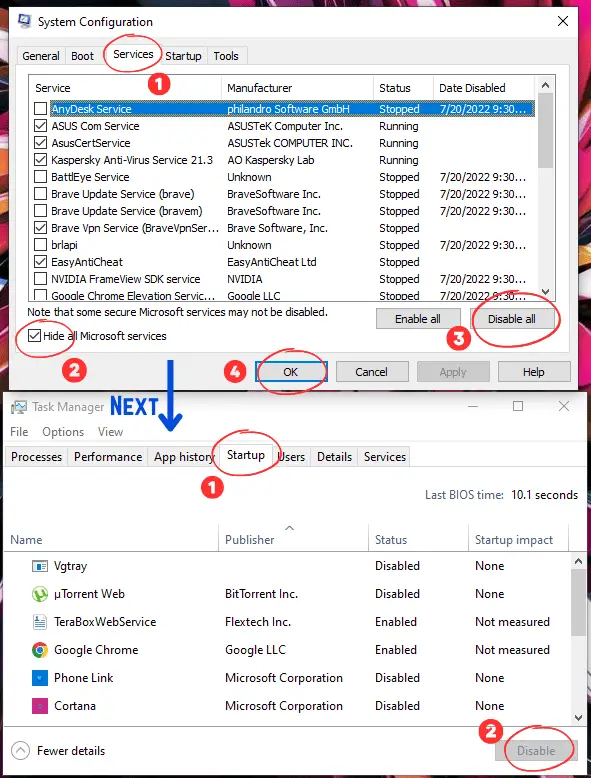
- Search for “System Configuration” in the search bar to open it.
- Select the “Services” tab from the window that appears
- Check the box “Hide all Microsoft services”
- Now click on “Disable All” and then “OK”
- Now open “Task Manager” and select the “Startup” tab
- There is the list of apps, disable all of them by clicking on the lower left corner “disable” and then Click “OK”
- Reboot the computer after doing this.
If your screen is clear from lines after restarting, then one of the apps you disabled earlier is the culprit. To find out what app it is, you’ll need to check the disabled apps individually in the Startup tab of Task Manager.
Although it may take some time, if you can identify and uninstall the app causing the issue, it will be resolved. It’s a good idea to take notes on the apps you disable so you can keep track of them. Once you know which app or program is causing the lines, keep the app disabled or uninstall it.
6. Use System Restore to Roll Back
If you see lines on your screen after a Windows update, then only try ONLY restoring the system works. In such cases, the line issues are caused by system setting changes. Also, if you’ve tried the above methods and the line still appears, and you suspect the software is the cause, attempt restoring the system.
System restore refers to restoring the system’s state at a point in time called a restore point, which is a regular backup of the settings. This will return your computer to a previous time when the settings were working correctly.
Here’s how to do a system restore:
- Search for “Create a restore point” in search bar and open it.
- Now click on System Restore in the System Protection Tab
- Select the Previous Date and Time of restore point (when there were no vertical or horizontal lines on the monitor screen and everything was fine)
- Click “Scan for Affected Programs” on the bottom and then the “Finish” button.

After clicking the “Finish” button, there will be a final confirmation screen. This is because once you run System Restore, you cannot stop it in the middle.
It will take some time, still be sure to click “Scan affected programs”. This is because you can see which programs and drivers System Restore will remove, and it is useful when reinstalling after the system restore.
If it can’t resolve the problem by following the above, it is suspected that the hardware is malfunctioning, not the software or OS.
7. Return GPU to rated clock
Overclocking the GPU could be the reason for turbulent vertical and horizontal lines. Thus, if you have overclocked your GPU, return the GPU to its original rating to see if the vertical or horizontal lines are disappeared. GPUs are mostly overclocked using software provided by GPU or third party manufacturers.
To revert the settings, open the software you used for overclocking and adjust the clock to the rated value. Once you have returned to the stock rating, restart your PC and check the display status. The same approach goes for the overclocked monitor.
Last Effort: Confirm the Hardware Culprit (GPU, Monitor, Mobo)
Even after all seven solutions, if the vertical or horizontal lines on the monitor screen aren’t removed. This suggests that the hardware is the root cause for lines on screen but the software, OS, or any application.
Once you’ve identified the cause of the problem as hardware, it could be the motherboard, GPU, or monitor, but many times GPU or monitor.
One thing you can do to test whether the GPU is the culprit is by replacing your discrete GPU with another working GPU. If you don’t have one, you can use testing GPU at any repair center. The same idea works with a monitor, but in the case of testing the motherboard, it takes time. Still, prior GPU and monitor for testing and then motherboard.
After testing, you will find the main hardware causing lines on your computer screen. Maybe you need repair or even replacement, so foremost, check the manufacturer’s warranty for validity. If it is within the warranty period, it will be repaired for free or at a low cost by contacting the manufacturer.
In conclusion, vertical or horizontal lines on a computer screen are a serious issue that must be fixed promptly. There are several potential causes of this problem. You should identify the cause first and then replace or repair it according to warranty terms. A prompt diagnosis and solution will save you time, money, and annoyance.