Where and How to Connect Monitor with Computer? (5 Steps)
When you purchase a new desktop computer, you need to connect all the devices yourself. It is common to get overwhelmed with many connection ports on the back of the computer body.
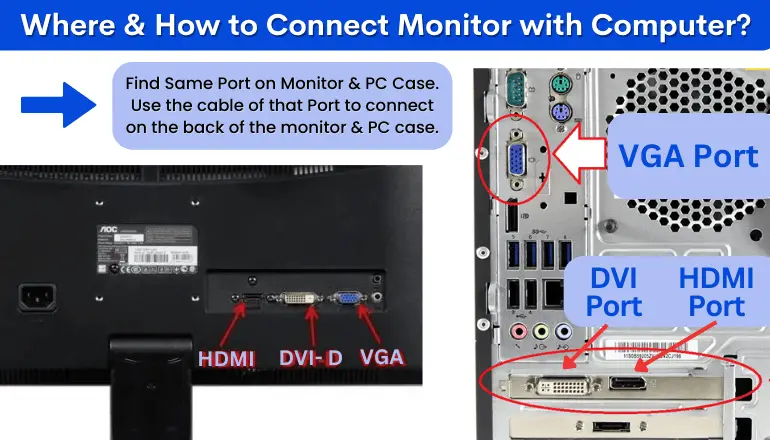
Therefore, this time, I will explain in detail where and how to connect the monitor to the desktop computer – the PC case which cable connector you need for your monitor, helping you distinguish the different options you have available.
Also, summarizing the characteristics that each of these options usually have so that you can make the most informed decision possible.
Where and How to Connect Monitor with Computer?
What Things to Know Before Connecting Monitor?
For the correct connection between your monitor and PC without error, it’s important to start by checking the available ports on both devices. Let me guide you through identifying the various types of power connectors you might find on the back of your PC case and monitor.
Commenting on their main characteristics and the resolutions they usually support because connectors come in several variants and differ in appearance from each other in different shapes and the number of external pins.
This way, you can make a more informed decision once you know your options.
1. HDMI
One of the most common ports is to connect with HDMI (High Definition Multimedia Interface), a transmission standard that enables both connections of audio and video signals. Due to its convenience in combining audio and video into a single stream, it is widely used in other electronics, such as TVs, Laptops, and projectors.
HDMI has three types of connectors. Generally, the one you will always find on computers is the big type A. HDMI connections are very easy to recognize because they have a trapezoidal shape with 19 flat pins on each side.
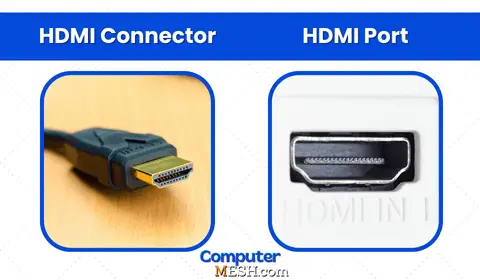
The difficulty with this standard is that it has several versions, so you will have to know if your HDMI is 1.0, 1.1, 1.2, 1.3, 1.4, 2.0 or 2.1.
The most common are 1.4 and 2.0, whose difference is between the bandwidth of 10.2 or 18 Gbit/s with a refresh rate of 60 Hz. As for the 4K resolution, it can run at either 24 or 60 fps, depending on which version you have.
To know the version, you will have to check the specifications of both your computer and monitor and then look for a cable connector also designed for that specific version of the standard.
When in doubt, opting for a cable of a higher standard is a safe choice as it is backward compatible and can be used with older equipment. However, the 2.1 standard supports 8K resolutions at 120 Hz but is less common.
2. DisplayPort
DisplayPort is another common connection method that looks like HDMI – the shape and size of the terminals in many ways still, the difference is noticeable and lies in its capacity to support higher video resolutions and best refresh rates, surpassing what HDMI can offer.
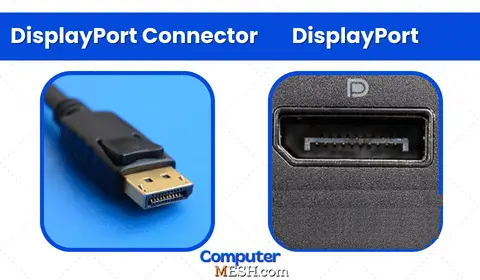
This makes it an excellent choice for demanding tasks such as gaming where response time is important or high-definition video editing.
But remember, not all monitors and computers have DisplayPort, so check this how it looks, so to connect.
Like HDMI, DisplayPort also has several versions. The most current is 1.4, which offers a bandwidth of 32.4 Gbit/s, allowing a maximum 8K resolution of 7,680 x 4,320 at a refresh rate of 60 Hz.
It carries both image and audio signals, like HDMI, and is capable of supporting HDR. Previous versions had resolutions of 2K at 144Hz (DP 1.2) and 4K at 120Hz or 8K at 30Hz (DP1.3). While for 144 Hz all versions cable allow the use at 1080p resolution.
In terms of display refresh rates and the ability to output to multiple displays via Multi-Stream Transport (MST), DisplayPort generally beats HDMI.
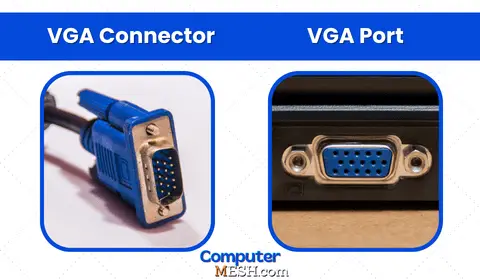
3. VGA
The Video Graphics Array (VGA) connection is pretty outdated and still found on many computers and monitors that are a little old, and it does not support the higher resolutions and faster refresh rates of HDMI and DisplayPort.
Because VGA is analog and doesn’t carry audio signals, the image quality can be lower, and you’ll need a separate cable for audio. However, it is still viable if your devices don’t have HDMI or DisplayPort connectors.
This is recognizable by its 15-pin connector, which can be used to transmit resolutions up to FullHD of 1,920 x 1,080 not supporting 144hz on monitor, but being an analog connection, the more the resolution increases, the more chances the image will be degraded.
Here it is important to note that supporting audio signals are applicable on those monitors with built-in speakers. If you don’t have a built-in speaker, it won’t matter. Here are the dedicated speakers or headphones you need to use.
4. DVI
DVI, or Digital Visual Interface, is another older connection method. It can provide a clearer picture than VGA because it’s a digital signal but doesn’t carry audio like VGA. This connector also has a trapezoidal shape with 24 flat pins divided into two rows and usually supports resolutions up to 1080p.
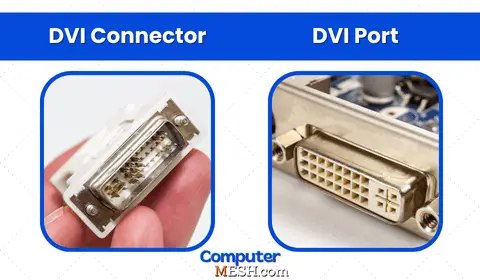
DVI is a somewhat complicated standard to understand since it has mainly 3 type which I explained previously. Here.
Even though DVI is a somewhat obsolete connector, many GPU and monitors still integrate this type of port. For 1080p monitors only, the DVI port offers faster speeds than an HDMI cable, which translates into sharper images. This is due to the direct transmission of digital signals. Undoubtedly, this is advantageous for gamers on small aspect ratios.
Which One Should You Use? You can connect a monitor and PC case with any ports available on both devices however, VGA and DVI cable is recommended for connecting the monitor only if there are no other better ports like HDMI or Displayport.
How to Connect Monitor with Computer?
Connecting a monitor to a PC is easy. Follow these simple steps:
- Ensure the monitor and computer have the same ports/interfaces and the required cable connector.
- Turn the power off both your computer and the monitor. Look at both devices’ backsides to locate the connecting port.
- Connect the cable connector of that port to the “output terminal” on the back of your PC, and then connect it to the monitor on the other end.
- If you’re using VGA or DVI, tighten the two screws on the sides of the plug in a clockwise direction. Don’t overdo it, though!
- After everything is connected, turn on the power for both your computer and the monitor. Your computer will automatically detect the device and configure itself accordingly.
Sometimes, you find more than one port to set up dual or triple monitors with cables either a DisplayPort, DVI, or VGA, depending on what’s available. It is also important to check the manual or UEFI BIOS settings for any specific recommendations from the manufacturer regarding which such setups.
Having Ports on Both on Motherboard and Graphics Board
Many times motherboards have integrated graphics (iGPU) and also a dedicated graphics card.
If both of these output terminals are in your system, it is recommended to connect the monitor to the dedicated graphics board (ports are located on the bottom and in a horizontal orientation), as it will generally provide better performance than the integrated graphics (located upper side and almost always in a vertical arrangement).
If there are no video outputs at the bottom of the system unit in a horizontal orientation, then this means that the computer is not equipped with a separate video card and uses integrated graphics. In this case, no option is left other than connecting the monitor to the integrated graphics port.
Also, one can install multiple GPU card in motherboard who require multi-screens setup.
Cause for Not displaying after PC is Connected to the Monitor
- Wrong connection
- Bad connection cable
- Bad monitor
- Bad graphics board
Check the above if the PC is connected to the monitor and nothing is displayed.
For PCs with a graphic board, video output is handled by the card itself. Connect your cable to the graphics card and not the motherboard, as this will prevent video output and you won’t see anything on your monitor.
If the cable is connected to a normal output terminal or input terminal, either the cable, monitor, or graphic board may be malfunctioning.
To troubleshoot, try using a different cable and see if the monitor displays correctly. If you can’t fix it by changing the cable, the monitor or graphic board is the cause. Use a spare monitor or graphics card to figure out where the problem lies.